Thursday, 12 June 2014

Speculaas Nanaimo Bars (and Canada's Taste Trail)

speculoos, speculaas, nanaimo, canada, anna olson, food blogger connect

Yes, Speculaas Nanaimo bars - sound good don’t they? Or perhaps you haven’t heard of Nanaimo bars at all. They are bars of deliciousness which originated in Canada (the city of Nanaimo to be exact). I have made original ones before which comprise a biscuit base, thick custard filling and topped with chocolate.


I was recently sent some spice mix to try out by a company, The Speculaas Spice Company. Speculaas biscuits, or cookies, originated in the Netherlands in the 17th century and they have been popular ever since. Steven who runs the company wanted to create a spice mix like the one that has been passed down through his family. Vandotsch speculaas as it’s called has a mix of 9 spices including cinnamon, ginger and cloves. Perfect to be used in any number of sweet treats, I wasn’t sure initially what to conjur up with the mix.

battersea arts centre


Then my inspiration came whilst I was at the Food Blogger Connect conference last weekend in London. The conference, held at the Battersea Arts Centre, was attended by food bloggers from all over and there were labs and knowledge hubs on various topics throughout the weekend. I will bring you more about this soon. At the conference though, was strEat party held for the attendees to sample foods from all over the world.


And one such country, you guessed it, was Canada. I love Canada, although it’s been 10 years since I last visited. Explore Canada was there offering 'Canada's Taste Trail' with delicious food and drink to sample. This included Canadian wine – which I love, but you cannot find in the UK for love nor money. There was also Icewine, a drink made from frozen grapes. It’s a more viscose drink than regular wine, with a slightly lower alcohol content, but my goodness is delicious. It’s meant to be sipped slowly and savoured. The icewine martinis on offer at the weekend were too good to turn down.


I discovered before attending the event that one of my favourite TV chefs was going to be there. Anna Olson, who appears on the Food Network in her shows ‘Fresh’ and ‘Bake with Anna Olson’ was there serving up flavourful grilled Canadian salmon drizzled with an ice wine syrup. Anna very graciously let me have my picture taken with her and it was a pleasure to meet her. If you haven’t seen her shows on Food Network, check them out!


The last Canadian treat that I sampled were Nanaimo bars (see it does all tie up) and they came in different flavours. The middle custard filling was flavoured with either the original, caramel, mocha or raspberry. The caramel was my hands down favourite and I will be looking for these when I return to London very soon (I believe you can buy them in Selfridges). But this gave me the idea to use the speculaas mix in the bars.


Upon my return I purchased the ingredients and whipped them up to take to my friend Claire’s for dinner. Claire and her husband loved them as I knew they would. I also took some into work and all of my colleagues were blown away by the flavours – the chocolaty biscuit base with coconut and nuts and then the spicy sweet filling. Everyone could taste different spices in the mix – cinnamon, ginger and I got a bit of an anise flavour.


Here’s how I made them:

Yield Approx: 20 bars

Biscuit Base:
113 grams unsalted butter
55 grams granulated sugar
1 medium egg
1 teaspoon vanilla extract
1 tablespoon unsweetened cocoa powder
320 grams digestive biscuits – crushed (21 biscuits approx.)
90 grams desiccated coconut
65 grams pecan nuts chopped

Filling:
56 grams unsalted butter, softened
2 tablespoons milk
250 grams icing sugar
2 tablespoons custard powder
1 ½ teaspoon Vandotsch Speculaas spice mix

Topping:
140 grams dark chocolate (65% min)
15 grams unsalted butter

Method:
Line an 8”x8” brownie tin with foil and set aside.
To make the base , in a bowl, place the butter, sugar, the egg, vanilla and cocoa. Place the bowl over a saucepan of simmering water (don’t let the base of the bowl touch the water) and gently stir the ingredients until the butter has melted and everything has blended. Remove from the heat and stir in the crushed digestives, coconut and pecans. Transfer the mix to the brownie tin and press down evenly, as firmly as you can. Place the pan in the fridge for 15 minutes to chill.


To make the filling, combine the softened butter, milk, icing sugar, custard and spice mix until it is a smooth spreadable paste. Add this to the top of the biscuit base and with an off-set spatula spread evenly. Place this into the fridge to set up, for about 30 minutes.


Lastly, melt the dark chocolate and butter together over another bowl, which is on top of simmering water. Pour the melted chocolate over the chilled filling and again, spread evenly.


Place into the fridge again and chill the bars for at least an hour before slicing up into squares.

The speculaas spice mix can be purchased at www.speculaas.co.uk. If you can't get hold of it there are plenty speculaas spice recipes online to try for yourself, although they won't be quite like Steven's mix!


Disclosure Statement: I was sent to the spice mix free to sample and was not requested to make a recipe with it. Any opinions expressed are my own.


Monday, 9 June 2014

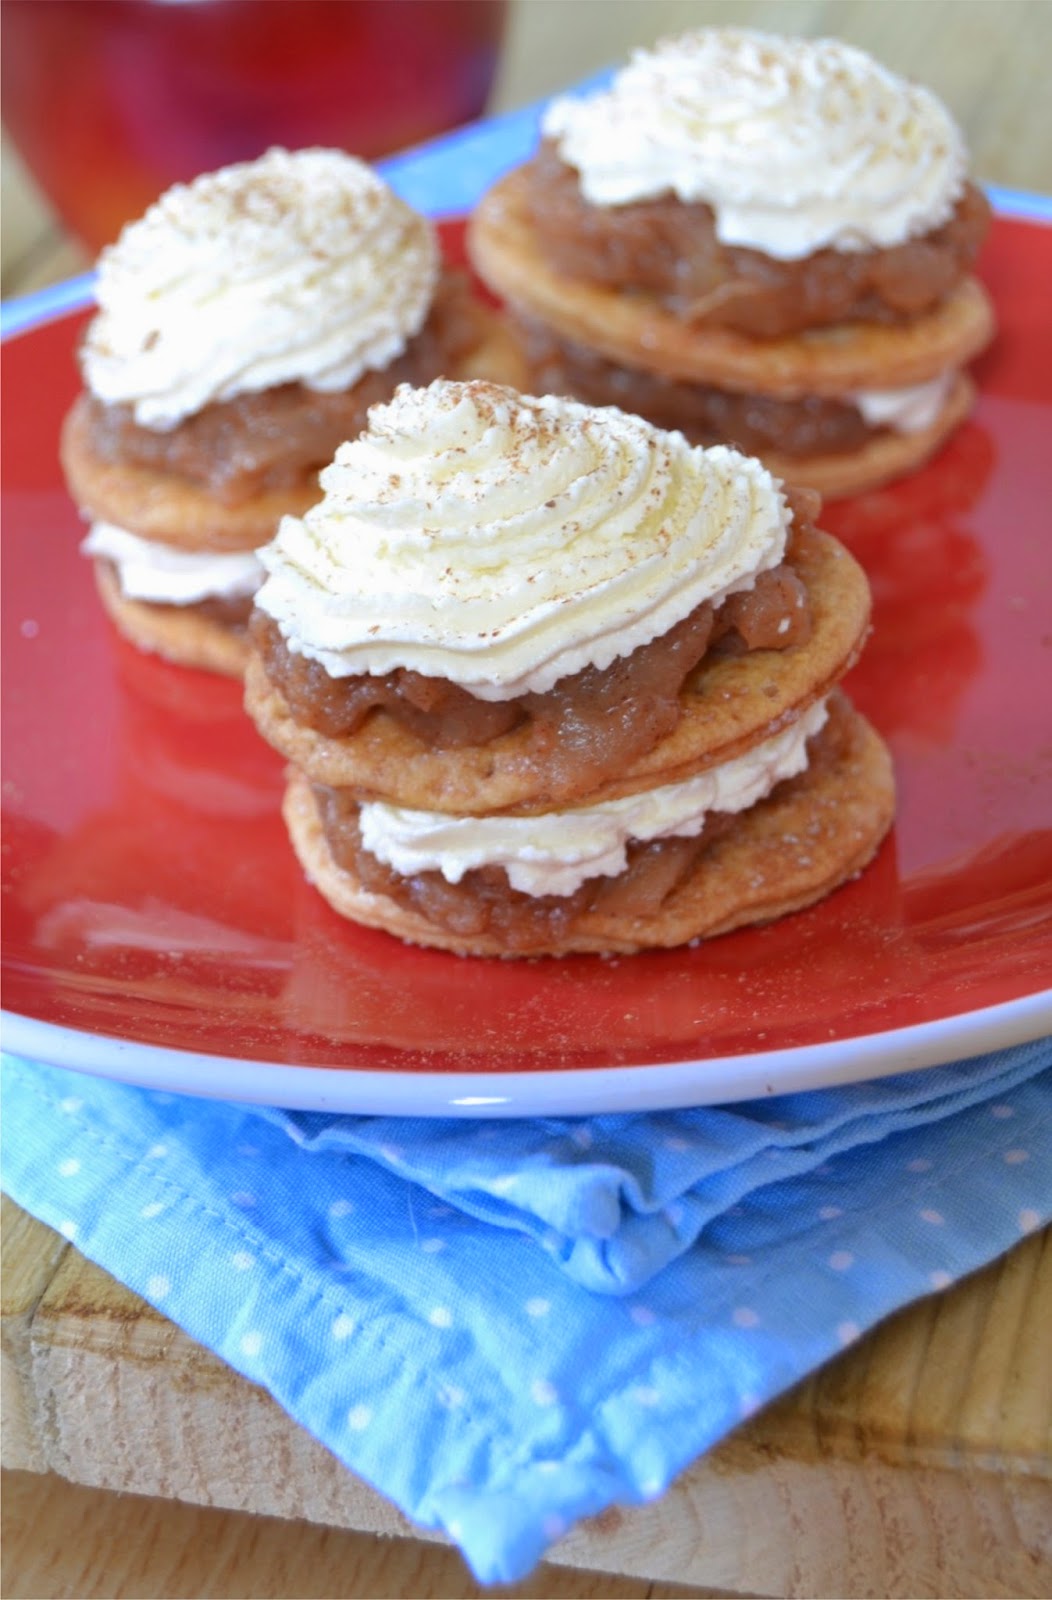
Deconstructed Apple Pie

mini apple pies


Who doesn’t love apple pie? Homemade is always the best, but what if you can’t be faffed or don’t have the time to make it from scratch? Read on!

So, what the hecky thump is a deconstructed apple pie? Well, all the elements you would expect in your apple pie are created separately, then layered up into bite size deliciousness. It tastes exceedingly good and is ready in under 30 minutes – honest!


The ingredients are short-cut ones too. No need to knock up a batch of shortcrust pastry or peel a pile of apples. Supermarket ready rolled pastry is used here, as are tinned apples.

All the expertise required is stirring, mashing and whipping really.

Here’s how I made it

Yield: Approx. 12 deconstructed apple-pies

Ingredients:
I package of ready rolled shortcrust pastry
I large tin of apples (765g approx.)
2 tablespoons butter
2 teaspoon cinnamon (plus more for garnish)
3 tablespoons Demerara sugar
1 teaspoon cornflour
Pinch of salt
250 ml double cream
1 teaspoon vanilla
Granulated sugar for sprinkling
Milk for wash

Method:
Preheat your oven to 180C and line a large baking sheet with greaseproof paper or silicon.

Unroll your pastry and with a cutter, cut out rounds, as many as you can get from your sheet.


Transfer these to the baking sheet and prick each disc of pastry all over with a fork and wash with a little milk. Lastly sprinkle each disc with sugar and place into the oven for 20 minutes.


In the meantime, add the tin of apples, butter, cinnamon, Demerara, cornflour and salt to a saucepan and place over high heat, stirring frequently. Make sure the butter melts and the sugar dissolves. After ten minutes, remove from the heat and with a potato masher, pulp the apples until no big chunks are left. Place back on the heat for another 10 minutes, this time on medium and stir frequently.

In between stirring, whip your cream with the vanilla until thick and place into a disposable piping bag.
After the 20 minutes remove the pastry discs from the oven and transfer immediately to a cooling rack. Also remove the apples from the heat and allow to cool slightly.


You can begin to build your deconstructed apple pies, by spooning some apple mix onto a pastry disc and then piping some cream on top.


Repeat the process and build two or three high, it’s up to you, I sprinkled some cinnamon on mine for garnish.


And a good tip, if you are taking these anywhere, place a pastry disc on top, rather than leaving the cream exposed.


But however you choose to build these, they are intensely apple pie like, with lots of cinnamon spice, crispy pastry and smooth vanilla cream.


I am entering these into this month’s Alphabakes hosted by Caroline at Caroline Makes (and alternately with Ros at The More Than Occasional Baker). The letter this month is D, and as these are entitled Deconstructed Apple Pies, I think they fit the bill!

Saturday, 7 June 2014

22 of My Favourite Blogs


They say imitation is the best form of flattery, so when I saw Lisa at United Cakedom give us a list of her most read blogs, I wanted to do the same.

Actually, as this post is being published I will be at ‘Food Blogger Connect’ in London meeting Lisa for the first time (I will be sure to bring you some snippets from FBC#14 on my return).

In the meantime however, I wanted to mention the blogs which I follow most regularly. Being a blogger is actually a busy pastime – if it is a pastime for you. In between working, the gym, baking, photographing, writing etc. I try to make time and  surf and read these blogs, and comment on them when I can.

I do visit other blogs, but these are the ones whom I have become friendly with their author, I enjoy their content and/or they inspire me!

United Cakedom – by Lisa
Tinned Tomatoes – by Jac
Farmersgirl Kitchen – by Janice
Belleau Kitchen – by Dom
The Caked Crusader – by CC
Kitchen Frolic – by Stephanie
Keep Calm and Fanny On – by ? (I call him/her Fanny)
As Strong As Soup – by Phil
Elizabeth’sKitchen Diary – by Elizabeth
Crumbs and Corkscrews – by Louise
Vohn’s Vittles – by Vohn
Blethering Boys – by Genna
Inside BruCrew Life – by Jocelyn
Sugarhero – by Elizabeth
Bakerella – by Angie
Cupcake Crazy Gem – by Gem
Becca Bakes – by Becca
Pint Sized Baker – by Karyn

Just a wee post today, as I am AWOL. But stand by for another recipe very soon!

As Lisa said at the bottom of her post, if you know of any logs you think I would enjoy (including your own), please leave the URL in a comment below.

Thursday, 5 June 2014

Tips On Making A Rainbow Layer Cake

Tips on making a rainbow layer cake

If you read my post about our last Clandestine Cake Clubevent, then you will have seen my rainbow layer cake.


Now, I know rainbow layer cake isn’t a new thing, but I wanted to share a few tips I have stumbled along, in my endeavour to getting the right colours, even layers and so on.

This cake was made for the theme ‘Childhood Memories’ where I set everyone the challenge of making a cake from their past, or basing it on a classic TV show, using sweets from their childhood and so on.
And this cake encompasses all these three things for me.

Firstly, I have made the rainbow part – this could be for the TV show Rainbow – remember Zippy, Bungle and George? And I made a buttercream to decorate it, and to enhance that I squished crushed up meringues into the buttercream, something birthday cakes from my childhood always had. And lastly I added some retro sweets on top like flying saucers, dolly mixtures and foam bananas.


This cake would be perfect for Treat Petite this month which also has theme ‘Childhood Memories’, if it wasn’t actually a cake. But it is, so I can’t.

Anyhow, on to the cake. I have made coloured cakes before, with varying degrees of success. My no cocoa red velvet always turns out a good vibrant red, but some colours have been better than others. Take my blue velvet cake from last year – more aqua than blue.

But for me, I found the best way to get the right colours, is through using a pale cake batter. The yellow hue of regular cake batter can influence the food colourings, hence the blue always turns a shade on the green side.

I now use a white cake recipe which has no egg yolks, only egg whites. And the butter in the recipe is yellow, but after beating the sugar with the butter for an inordinately long time, I discovered that the mix became almost white! No idea why, there is probably some reason, but I left the mixer on high for at least 5 minutes. The result was a smooth creamy white blend.

Vanilla extract can colour the batter also, so use it sparingly or add another clear flavouring. You could use almond, coconut, strawberry or anything that takes your fancy.

For the colouring, I use 6 colours – Red Extra, Apricot/Tangerine, Egg Yellow, Spring Green, Royal Blue and Grape Purple. I know the rainbow has 7 but I’m not getting fussy about indigo and violet. Purple seems a good compromise. I always use food pastes/gels now. Usually the Wilton brand. You don’t need much, but I can’t tell you how much exactly, this will be something you have to eyeball. Use a toothpick and add a little at a time. Remember you can always add more, you can’t take it away. But the more vibrant the batter, the brighter the cake will be.

To ensure the layers are equal, I actually weighed the cake batter after it was mixed (I’d pre-weighed my bowl and subtracted that). Going by the white cake recipe, I divided it into six and each layer of batter weighed 240 grams.


I used 6 bowls and coloured three portions of the batter (red, orange and yellow first) as I only had three cake tins the same size (8” or 20cm). I baked these for about 10 minutes each – as they are thinner layers of batter they don’t need long in the oven.


I then turned them out and repeated the process with green, blue and purple. The layers do look thin – I was worried. But don’t be. When they are sandwiched together with a filling such as buttercream they make a perfect sized cake. Also, the baked cake won’t look a vibrant colour on the outside. But when you cut into the finished cake, the colours will look amazing!


These are my own thoughts and experiences on making the cake. If you have any questions or thoughts on making a rainbow cake, please get in touch.

Here is the recipe for the white cake:


print recipe

White Cake
Ingredients
  • 400 grams plain flour
  • 1 tablespoon baking powder
  • ½ teaspoon salt
  • 225 grams unsalted softened butter
  • 450 grams granulated sugar
  • 1 tablespoon flavour extract
  • 7 large egg whites
  • 250 ml milk
  • variable food colour pastes
Instructions
Line and grease 3 x 8" baking tins. Pre-heat the oven to 180C. In a bowl, sift together the flour, salt and baking powder. In another bowl mix together the egg whites, milk and flavouring. In the bowl of a mixer, beat the butter and sugar together on high until light and fluffy and pale (at least 5 minutes). The mix should look very pale in colour. Add one third of the flour mix and gently mix through. Add half of the wet mix and mix this until incorporated. Repeat with another third of the flour, the remaining wet mix and the last of the flour. Split the mix evenly into 6 equal amounts. Colour each batch the appropriate rainbow colours. Pour the first three lots of batter into the pans and bake for 10 minutes, until lightly golden on top and a toothpick comes out clean. Let cool for 5 minutes before removing from the pans. Repeat for the remaining three colours. There you have 6 layers of rainbow sponge. Sandwich together with pre-made frosting or homemade and decorate.
Details
Prep time: Cook time: Total time: Yield: 1 8" layer cake


Monday, 2 June 2014

Treat Petite June 2014


Another month brings a new Treat Petite theme!

Thank you to all who took the time to enter in May – check out Kat’s post for all the entries over at The Baking Explorer.

Well, this is my first month of hosting, that there hasn’t been some sort of event going on i.e. Halloween, Christmas, Valentines or Easter! So what theme will I spring on you all (and it's NOT the World Cup!)?

You may have read my last post on the Clandestine Cake Club event I recently hosted. The theme I chose for that particular event was ‘Childhood Memories’. And I loved how it got all my fellow cake clubbers to be very creative, so I am going to set you the same theme. But, of course, no cakes allowed in Treat Petite!


Childhood memories could be a bake you remember eating when you were a child, or something you used to make with a relative. Or you could even incorporate sweets from your childhood into the treat. Or even base it on a favourite TV show, toy or pop group you loved as a child.

Take a look at the cakes at the meeting here, to get you inspired.

Here’s those all important rules…

Treat Petite is for all of those delicious bites, which can be individually portioned. Tray bakes are fine, cookies, cupcakes, brownies, macarons and so on. No cakes, puddings, loaves – you get the idea…here are those all-important rules.

  1. Email us by the 25th of the month, midnight at the latest – include in the e-mail your name, if you have a blog the URL of your post and name of your blog, recipe and a photo (640x480pixels max) of your bake.
  1. If applicable post your bake onto your blog and link back to Cakeyboi and The Baking Explorer, stating who is hosting that particular month.
  1. Follow Cakeyboi and The Baking Explorer blogs via the Google Join this Site button, if you haven’t already.
  1. If you tweet use  #treatpetite and mention @MrCakeyboi and @BakingExplorer – we will retweet

  2. Add the challenge logo to the post and ‘Treat Petite’ as a label to the post

  3. Use any recipe as long as the source is noted
  1. Add your photo to the ‘Treat Petite’ Pinterest board (request access from me – Cakeyboi)
  1. Feel free to enter old posts as long as you update the post and meet all the requirements above!


Above all else – have fun!!

Saturday, 31 May 2014

Clandestine Cake Club Dundee May 2014


It was another Clandestine Cake Club in Dundee and this time I was host.

It’s actually getting really tricky to find new venues for the club – Dundee has a lot of places, but not all have space for clubs, or are willing to let you have the venue gratis.

A bar had recently reopened in the Seagate area called Cask and Cork. I ventured in and asked if they would be willing to host, and they kindly agreed. What they failed to tell me was that they had a singer on the same night!

I turned up at the bar, and was greeted by my fellow cake clubbers and the sound of the gentleman singing. He had a great voice. Opinion seemed divided though. Some clubbers liked having the music and others found it too noisy! You can’t keep everyone I suppose...


The theme I chose for this Cake Club outing was ‘Childhood Memories’. I asked the bakers to bring along cakes which they may have liked as a child, or baked with an adult when they were young. Or alternatively they could decorate a cake with sweets from their childhood, or even base it on a TV show, pop group or toy they liked when young.

And the cakes did not disappoint.


We had a mandarin gateaux, a rhubarb streusel cake, a classic Victoria sandwich, and a Dorset Apple cake.


Then we had an Oreo cake, a Frasier Cake,  rhubarb and rosewater yoghurt cake and a battenburg.


I know I shouldn't have favourites, but I loved the picture on top of Jane's Rhubarb and Rosewater Yoghurt cake. Oh and I wish Jane's daughter a speedy recovery by the way!


My own creation was a rainbow layer cake which I thought initially represented Multi-Coloured Swap Shop with Noel Edmonds, which I used to love on a Saturday morning. But someone then said it was a rainbow – what about the TV show Rainbow. So take your pick. I also decorated the outside with buttercream and crushed meringue, something I remember from birthday cakes of old. And I then I added some retro sweets on top. Check out my post later in the week to see how I made the cake.


The night was great and everyone took lots of leftovers of cake, and left with a full tummy!


The Cask and Cork was formerly a cinema in Dundee and was transformed into a bar in the early 2000's.


7 Seagate
Dundee
Telephone: 01382 202212


Thursday, 29 May 2014

Chocolate Lime Krispie Treats + Giveaway Winner


It dawned on me recently I hadn’t made krispie treats in a good while. At the start of Cakeyboi I made them quite a lot. They are easy to put together and I find you can change the flavours up quite a bit.

I’ve made Lemon Meringue Pie flavour, Black Forest, BirthdayCake and more.

And for inspiration this time I looked at the jars of sweets in my local paper shop, ready to be dispensed into quarters, in a wee white poke!


I used to love Chocolate Limes especially. Remember them? An unusual combination of flavour, which makes the two components taste completely different when eaten together.

I loved the hard sugary lime ‘boiling’ on the outside followed by the chocolate centre. How well would these work as krispie treats and how could I get that flavour into said delights?

Well, instead of plain old Rice Krispies, I reached instead for a box of Coco Pops, a cereal I used to shovel into me by the bowlful when I was a child. I believe too, they are called different names in different countries. In the US they are called Cocoa Krispies and Choco Krispies in large parts of Europe. Who knew? So, that was the chocolate part taken care of.

And for the lime, I used, well – a lime! I added fresh lime juice to the marshmallows and sprinkled lime zest over the simple icing I drizzled over the top.


Once they set up, they were a nice alternative to ordinary krispie treats and I may have to think of other chocolate combinations, but for now – here is how I made them!

Yield: 16 squares approx.

Ingredients:
200 grams mini marshmallows
30 grams unsalted butter
125 grams Coco Pops
Juice of two limes
Zest of one lime
Icing Sugar (amount will vary)

Method:
Grease a pan approximately 8”x12” in size and set aside.

In a large saucepan, place the butter and marshmallows over low heat and stir until they are melted. 


Stir in the juice of one lime. Add the coco pops and stir the mixture thoroughly so all of the cereal is coated with the mallow.

Transfer to the prepared pan and press it down firmly, so it is even all over the top. Allow this to set for at least two hours.

Remove from the pan, after they have set, and cut into squares.


Make a simple icing from icing sugar and lime juice. A few tablespoons of icing sugar and a few drops of lime juice should be enough.

Drizzle this over the top of the bars and sprinkle with the lime zest. Allow the icing to set, about one hour.

And there you have a time machine, transporting you back to those chocolate lime sweeties. But these are even better course! Enjoy…

And congratulations go to Laura from Kent who won the OXO Baking Bundle!