Saturday 28 June 2014

Treat Petite June 2014 Round Up

It’s time to see what deliciousness was baked up for this month’s Treat Petite challenge. The theme this month was Childhood Memories and this obviously got the memory banks rewinding to back in the day!


Firstly was Kerene from The Dream Baker. Danish Butter Cookies were a favourite childhood snack of hers and she reminisces about the tins of cookies which she had as a child. Kerene’s cookies are individually piped and look light and tasty.


Laura at I’d Much Rather Bake Than came up with these Smarties cookies. Who doesn’t remember Smarties as a child? Laura explains as a child she mixed up teaspoon with tablespoon and you can imagine the result. Thankfully, that mistake didn’t happen here!


Helen at Casa Costello made these Coffee Melting Moments. These are adapted from ones her mum used to make when she was wee. I love the addition of coffee here.


Elizabeth at Elizabeth’s Kitchen Diary made these nostalgic biscuits from her rural Canadian childhood. She says these are similar to ginger snaps. I love that crinkle on top! Delicious.


Choclette at the Chocolate Log Blog made these coconut chocolate bars for Father’s Day and for Treat Petite. The recipe is reminiscent of Bounty Bars she says, which she used to get as a treat when she was a child.


Helen at Family-Friends-Food made these speculaas spiced date cookies. Her mum had lost the original recipe, but it later turned up and Helen was transported back to her mum’s kitchen once more.


Kate the Gluten Free Alchemist made these rather delicious looking Battenberg Slices. Gluten free, with home-made marzipan, she was worried I wouldn’t allow these as they were slices of a big cake. But served up individually these are perfect.


Ros at the More Than Occasional Baker made these very retro cornflake chocolate chip bites. She found them in a book her mum passed down to her. Ros loved this theme and said she was excited to see everyone else’s creations too.


Caroline at Caroline Makes entered these Jap Cakes form her childhood. I’ve never heard of them, but they sound lovely, made with egg white, ground almonds and other ingredients. These sparked quite a conflab on Caroline’s website about the origins of the cake. Pop over and take a look!


Back to the Dream Baker Kerene, who also submitted her cinnamon baked doughnut holes. Doughnuts take Kerene right back to her childhood and this adaptation of an Ina Garten recipe certainly makes me drool!


Sisley at Sew White made these yummy looking Marshmallow Chocolate Bites. These are a childhood treat updated to appeal to grown-ups also – with an added stick made from a straw.


Kat, my baker in crime, from The Baking Explorer made these cola cupcakes. She made them with cola flavouring, an homage to her favourite sweets as a child – cola bottles. Decorated with cola bottles too they look scrummy.


Lastly my entry, which is very similar to Sisley’s. We called these Top Hats and were made at every childhood party I was ever at. Chocolate, marshmallows and smarties, these are very easy to whip up in a flash. Easy for kids to make too.


So that is the childhood round up for you. A huge thanks to everyone who took the time to enter their creations. Stay tuned to The Baking Explorer to find out July’s theme!


Thursday 26 June 2014

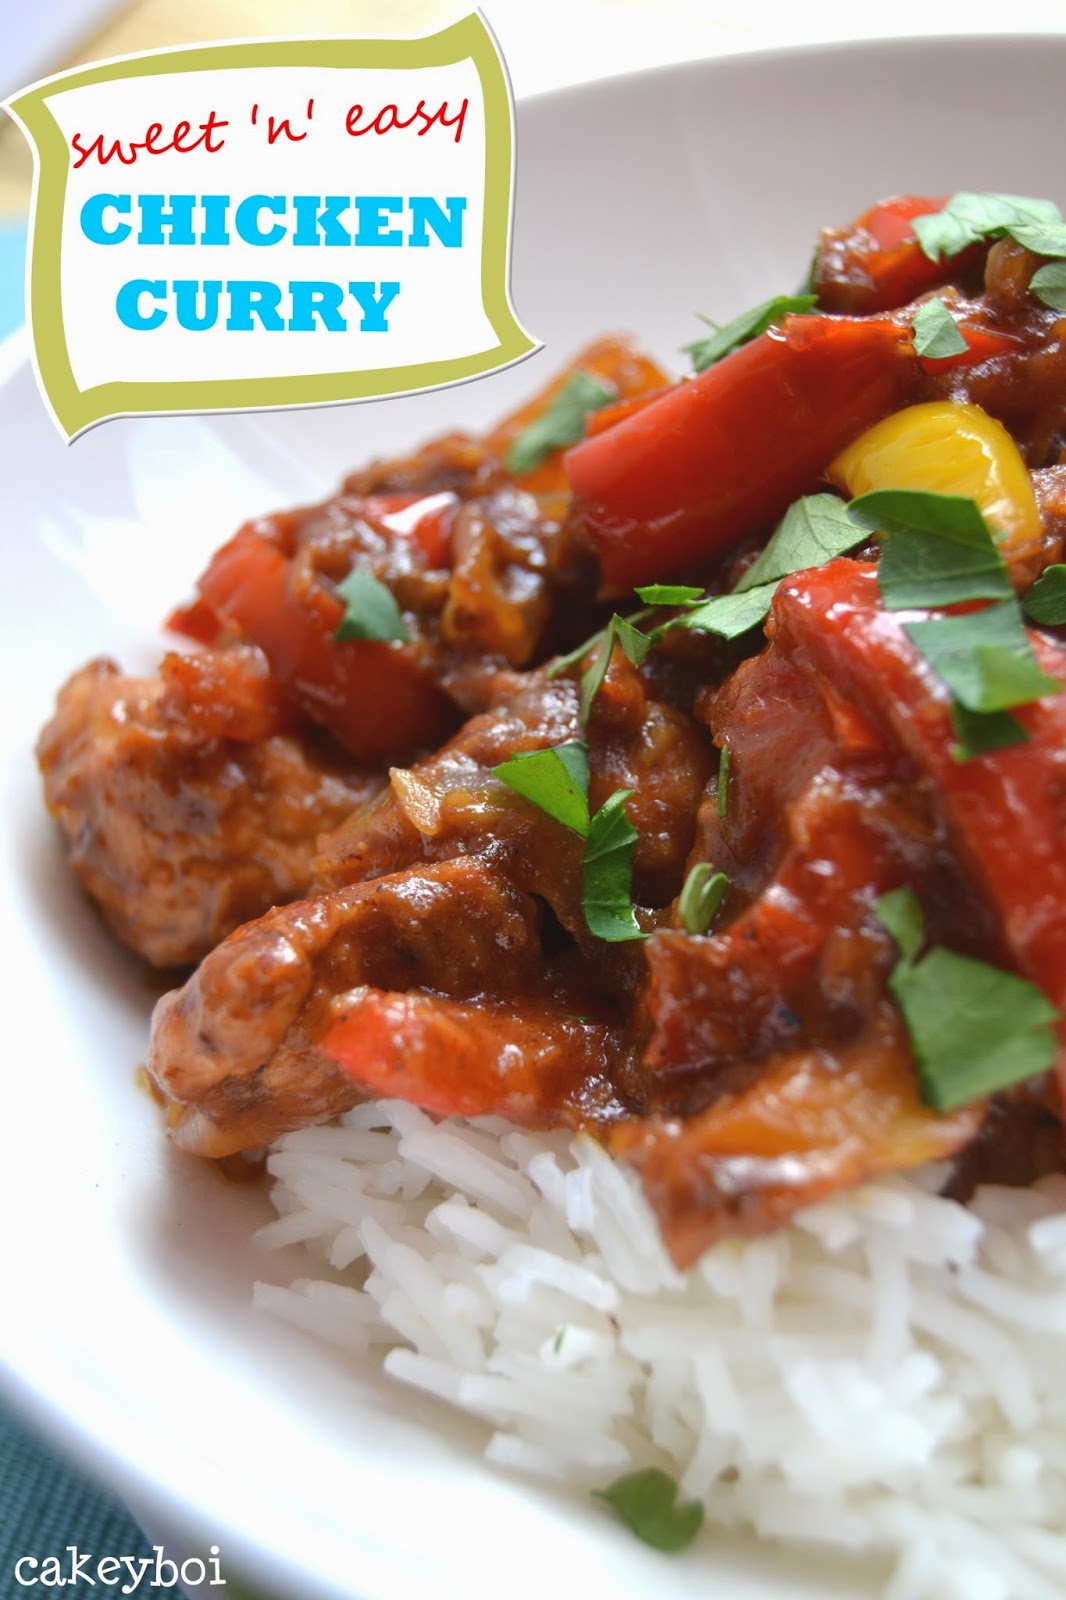
Sweet 'n' Easy Chicken Curry

I know, I know, I know! Before you say it – I know. This is Cakeyboi, you have come to the right blog. This is just a slight deviation from the normal sugary treat-fest I bring you!

chicken curry recipe


I make this chicken curry a lot and have passed the recipe on to many friends. And they keep saying I should write about it.

So, nothing ventured, nothing gained, this is a bona fide Cakeyboi non-baking savoury recipe. It is very loosely inspired by a curry recipe I saw on the Rachael Ray show once, when we used to get that programme in the UK. I just googled the original recipe now and to be fair, there is very little similarity. Mine is much easier and uses a lot less ingredients.

It is so easy to make, less than 30 minutes if you are in a rush. More if you want to let it simmer whilst you do other things. It is sweet, with mango chutney, peanut butter, coconut and mild curry powder going on.

I use chopped up chicken breasts and add an onion and a couple of bell peppers to the mix. To serve I make some rice and buy a store-bought naan bread to serve on the side. You can make it as saucy as you like, to use the naan for mopping up the sauce. Or you can make it a thick gooey curry. Totally up to you. Here is how I make it:

Ingredients:
2 tablespoons vegetable oil
2 large chicken breasts, cubed (approx. 400 grams)
1 large white onion
2 large bell peppers
90 grams smooth peanut butter
90 grams mango chutney
8 grams mild curry powder
15 grams desiccated coconut
Water from a recently boiled kettle
150 grams rice
Loosely adapted from Rachael Ray

Method:
Chop the onion in half and slice thinly. Slice the peppers into long thin strips.


Heat the oil in a large frying pan/skillet and fry the onions until translucent. Add the peppers and continue to fry and stir for a couple of minutes before adding the cubed chicken. Add a little more oil if the mix is dry.


When the chicken is lightly browned, add the peanut butter and stir through so it melts a little. Next, add the mango chutney and stir this through.

Add the curry powder and stir this in, then add water from the kettle covering the mix. It will sizzle and bubble. Add the coconut and stir this through. Continue to let the curry boil and the water reduce. The sauce will become thicker.


In the meantime, prepare the rice. Add more water to the curry if it’s is getting too dry.
Remember, you can make it as saucy or thick as you like.


When the rice is ready, so is the curry. Plate the rice and spoon the curry on top. (Garnish with a little parsley - if you want to!)
It really is that easy. It is nutty, sweet and is one of my own favourite recipes.

And a wee tip, a friend who makes it told me, is if you make it with chunky PB it adds a touch of crunch too!

There we go, my first (and last?!) foray into a proper savoury dish. Enjoy...


Monday 23 June 2014

Homemade Fat Free Frozen Yoghurt


I purchased an ice-cream maker last year, thinking I would use it non-stop last summer – which was a relatively good one for Scotland. But, best laid plans and all that – I used it once to make (dare I say it) a rather delicious concoction inspired by a Coldstone Creamery ice-cream I had in New York last year – full of cherry pie filling, sprinkles and gummy bears – check it out!

But this year, I hope to use it a wee bit more and thought I had better get started whilst the weather is on my side. And I decided to try frozen yoghurt as I love the stuff.


And I used 0% fat Greek yoghurt, some vanilla bean paste and only a couple of tablespoons of sugar. Not too bad at all on the waistline. Which, of course, means you can go to town a little bit more on the toppings.

I went for a couple of toppings – sprinkles, chocolate chips and some Yuzu Citrus Seasoning I was recently sent to try.


The dressing has a wide variety of uses and can be used in sweet or savoury dishes. It’s flavour is quite ‘soor’ as wee Scots say – quite tart. It is like graprefruit with a little mandarin thrown in too. The dressing is like a syrup and goes well with the sweetness of the froyo!


Yield: Approx 500 grams Frozen Yoghurt

Ingredients:
500 grams 0% Fat Greek Yoghurt
1 Tablespoon Vanilla Bean Paste (or extract)
2 Tablespoons granulated sugar (or sugar substitute such as agave nectar or stevia)

Method:
Prepare your ice-maker as normal, ready for use.

In a bowl, mix the yoghurt, vanilla and sugar. Pour into the ice-cream maker for the time recommended in your usual manual.


Transfer the frozen yoghurt to a plastic container, cover and freeze for at least a couple of hours (the machine makes a soft mix only).


When ready to serve, sprinkle with your favourite toppings and enjoy.

Disclosure Statement: I received the Yuzu Citrus Seasoning free to sample. Any opinions expressed are my own.

Saturday 21 June 2014

Anyone for Strawberry Bellini?

strawberry, bellini, prosecco, wine, sorbet, syllabub


I was recently sent wine to try out from Sainsbury’s. I love my wine, especially red, so was looking forward to sampling what they had to offer.


I was sent a bottle of white, red and prosecco to enjoy.

Firstly the white which was Vinho Verde, a Portuguese wine. This wine has won several awards including the International Wine Challenge commended winner. The wine is described as light and fruity and a little bit spritzy. It goes perfectly seafood. I tried this and found it pleasant, not my favourite. But then I am not as big a fan of white.

Here’s a perfect recipe to use the wine in, from Helen at Fuss Free Flavours. It’s for an Easy Black Cherry Syllabub. The recipe calls for a dry wine and this is fairly dry, 3 on the scale where one is dry and 9 is sweet.

courtesy of Fuss Free Flavours


The bottle of red was a Fairtraide Malbec, another award winner, this one claimed silver in the IWC. It’s described as full bodied and robust, packed with flavours of blackcurrant and damson. It goes well with roast beef. Me, personally, I love red wine with a big bag of crisps which I enjoyed with this one.

But here is another recipe to try out with this red. From my friend Jac at Tinned Tomatoes, this is for a melon, peach and red wine sorbet. The robust flavour in this red would be a good contrast to the fruity flavours going on in the sorbet – and is perfect for summer weather.

courtesy of Tinned Tomatoes

The Conegliano Prosecco is a gold winner this time in the IWC. It is described as fresh, bubbly and full of apricot flavours.

As Wimbledon is upon us very soon, I decided to use the prosseco in Strawberry bellini. Usually made with peach nectar, I decided to whip up some strawberry puree instead. Some of the puree in the bottom of your glass, topped with the bubbly stuff and you have a delicious drink to watch any of the tennis matches with, whilst you snack on fresh strawberries.


To make the strawberry puree, I simply took my stick blender to 400 grams of strawberries and then added two tablespoons of sugar. I stirred the sugar in, until it dissolved and let it sit for while to let the flavours meld. You could use the puree straight away if you prefer. Add some puree to the bottom of a champagne flute and then add the Prosecco. Refreshing!


Disclosure Statement: I was sent the wine from Sainsbury’s free to review. Any opinions expressed are my own.

Wednesday 18 June 2014

Pancetta and Parmesan Grissini

pancetta, parmesan, grissini, breadsticks


Everyone enjoying the World Cup? Wall to wall football? No, me neither.

Football and I have never gotten along. At school, if you didn’t like it, it seemed like a cardinal sin. And being Scottish and not liking football seems to be an even worse crime!

But when OXO UK asked me to take part in their World Cup Blogger Challenge, I conceded this would be my one and only mention of ‘the great game’.

I was asked to come up with a recipe from a participating country, and being part Italian, of course I decided to bake from that part of the world.


I decided to make grissini – or breadsticks, which I had never attempted before. And to make them even more Italian I decided to add chopped up pieces of pancetta and parmesan cheese.

Grissini would be perfect for snacking on whilst watching a match – or not!

To make these OXO provided me with a couple of tools to help out in the kitchen.


Firstly there was the flour sifter. It does what it says – you add your flour and sift it into the bowl. But the advantages, I found, are that you can weigh your flour in the sifter, then remove the plastic bottom before shaking the sifter from side to side (it’s as easy as that) into your mixing bowl. It’s also good for sifting icing sugar too.


I was also sent an oven thermometer. Why the need for an oven thermometer you might ask when it already has a temperature control? I have read so many places that oven temps can vary greatly from what your thermostat says. I really wanted to see what my oven reading was.

Luckily, mines was spot on. 220C for these breadstick beauties it read on my oven and the handy thermometer which clips on to your oven shelf.

Here’s how I made the Grissini.

Yield: 20 breadsticks approx.

Ingredients:
75 grams wholemeal flour
180 ml warm water
1 tablespoon honey
1 tablespoon dry active yeast
150 grams plain flour
3 tablespoons olive oil
1 teaspoon salt
4 tablespoon freshly grated parmesan
65 grams pancetta
adapted from The Kitchn

Method:
Fry the pancetta in a pan until it has gone crispy. Let cool and chop into small pieces.


In a bowl place the wholemeal flour, water, yeast and honey. Stir until combined and let sit for 5 minutes or so.

Add the plain flour, olive oil, salt and parmesan and mix until combined, either with your hands or a wooden spoon.

Turn out onto a floured surface and knead for 10 minutes.

Place into a lightly oiled bowl and cover with cling film. Let the dough rise for an hour and a half then remove from the bowl, back onto the floured surface.

Flatten the dough with your hands and sprinkle the chopped pancetta over it. Fold the dough over and knead for a couple of more minutes, so the pancetta is worked through evenly.


Next cut pieces of dough, weighing 30 grams each and roll into long snakes about 30cm in length.
Place these onto a baking sheet lined with greaseproof paper.


Pre-heat the oven to 220c and let the breadsticks rise again whilst the oven comes to temperature.
Pop into the oven and bake for 10 to 15 minutes or until they turn golden brown.


Remove from the oven, sprinkle with a little more parmesan whilst hot and let cool slightly before enjoying!

These aren’t dry or tasteless like the breadsticks you buy from the supermarket, but do have a good crust and chewy middle. They are perfect to snack on with a beer when you are watching the game – ahem!!


I also made a quick dip for these from a Williams-Sonoma recipe with cheddar cheese and beer – and it was delicious warmed up in the microwave!

Disclosure Statement: I received the OXO items free to review. I was not asked to provide a positive review. Any opinions expressed are my own.


Monday 16 June 2014

Top Hats

marshmallow, chocolate, smarties

A couple of years ago, not long after starting Cakeyboi, I made Posh Top Hats. I realised pretty soon after posting this that I had jumped the gun a wee bit.


I made a more grown up version of this little treat that I grew up with, thinking that everyone knew what Top Hats were! How wrong could I have been?


Well, it seems like these are not internationally known, but more a local delicacy. Top Hats are very, very easy to make and perfect for a kids birthday party, or take to a bake sale.

All you have to do is melt chocolate and that’s as technical as it gets. Petit four cases are lined with a little of the melted chocolate then a marshmallow is sunk into the chocolate. A little dollop of molten choc on top then a smartie added to that and that’s it!


There was always a brand of marshmallow you HAD to use for these, nothing else would be right. They were Princess marshmallows. They came in pink and white and were the perfect shape for Top Hats. I went looking for these when I was going to make them, but could I find them?

I did find ones named Candyland marshmallows, and it turned out these are the same. I’m not sure if they’ve rebranded Princess ones. Anyhoo, as for the chocolate, the cheaper the better is what is called for here if you want truly authentic Top Hats. A baking chocolate called Scotbloc was always used and I don’t think it had been near a cocoa bean in it’s life. I couldn’t get that so supermarket own brand cooking (milk) chocolate was a good substitute.

But it melted well and set quickly so was the go to ‘chocolate’ for the job. And real Smarties had to be used. None of those milk chocolate beans nonsense. I bought a bag of Smarties to make these and realised they were mini-Smarties, but they look cute I thought!

It’s not really a recipe as such, but here goes

Petit Four cases
Two bags of marshmallows (400 grams in total)
300 grams of cooking chocolate (milk)
Smarties to decorate

Method:
Melt the ‘chocolate’ in a microwave or over a pan of boiling water (microwaves were scarce when I was young).


Spoon chocolate into the bottom of each case and place the mallow into the chocolate. Lastly a drop of chocolate on top and add the Smartie. That’s it. Just let the chocolate set and they can be set out for whatever function you are catering! Kids and adults gobble these up, so make lots.


And if you do want to go that little bit further – check out my Posh Top Hats. Three colours of homemade marshmallow and dark chocolate are used for these. And I went the whole hog and used a peanut M&M on top. These weren’t exactly the same, but were fun to whip up.


As these are from my childhood, I am submitting them into Treat Petite this month as I came up with the theme Childhood Memories. I am hosting and Kat at the Baking Explorer will be next month.


And I am submitting these into Laura’s Biscuit Barrel challenge at I'd Much Rather Bake Than – the theme this month is Summer. My birthday is slap bang in the middle of summer, so Top Hats remind me of that time.


And this month’s We Should Cocoa is going gluten-free and these fit the bill perfectly! Michelle at Utterly Scrummy is hosting this month.


Saturday 14 June 2014

Food Blogger Connect 2014

If you read my recent post with the recipe for Nanaimo Bars you will have seen me mention that I was recently at a food blogger conference. It was actually Food Blogger Connect, held in the lovely Battersea Arts Centre.


FBC was founded in 2009 and is the world’s foremost food blogging conference. Bloggers come from all over the globe and listen to guest speakers, network with companies, fellow bloggers and FBC is invaluable in terms of its international reach.


There are interactive labs to take part in, knowledge hubs and classes on photography, marketing and food writing and so on.

There is also a street party – called strEat party, featuring new foods and drink  from across the globe, for all attendees to enjoy as the day goes on.

My original intention was to bring you a few posts over the next few weeks on FBC, but other bloggers are doing this so much better than I could. I shall just give you a quick run through of my weekend and some photographs from the weekend along the way.

Jac (from Tinned Tomatoes) and I flew down on Friday morning to London and reached the venue, Battersea Arts Centre, just before midday. Jac introduced me to lots of fellow bloggers. It’s quite strange knowing so many people by blog alone, then meeting them in the flesh.


From midday to 2pm was a meet and great where founder Bethany Kehdy opened the conference and everyone sampled the delicious foods on offer.


My friend and fellow blogging baker Lisa from United Cakedom then arrived and we chatted and got to know each other before the classes started.


The afternoon was filled with talks and seminars before the first of the labs I had booked. This was hosted by Urvashi Roe and was about blog content planning. Have a look at Jac’s post on this seminar.


The strEat party followed after this where we drank tequila (lot’s of it!) and tasted the different foods available. Canada was featured heavily and there I met Anna Olson from the Food Network (I know I mentioned this in my last post, but I was star-struck!!).


The day ended, I was exhausted (I had been up since 4am!) and I hit the hay before another day of classes.


The first of which was food photography and styling with food blogger and photographer Donal Skehan and stylist Sharon Hearne-Smith. This was really interesting and taught me loads about the ways to present your food and take those all-important drool worthy snaps. Read Jac's post about this.


There were more talks throughout the day and in the afternoon was an interview session with Yotam Ottolenghi. I have to admit that although I had heard of him, I didn’t really know much about him. Other bloggers clearly did and were so excited to see him.


More talks in the afternoon before another strEat party and I headed back to the hotel fairly early as I was shattered.


Sunday started a bit later for me, I headed for a Starbucks first thing and took a few snaps around Clapham, where I was staying before wandering up to the Art Centre. 


After a few more classes, the closing ceremony took place. There I met another male baker Luca who goes by the twitter handle @chuechebueb – which translates as cake boy in swiss german! Luca and I got on really well (pictures can be deceiving) and shall be collaborating at some point in the future.


Jac and I grabbed our goodie bags and headed straight back to the airport and the weekend was over. It was a late night, I was really tired but had enjoyed a fantastic, educational and food friendly weekend!