Thursday, 5 February 2015

Panna Cotta with Blueberry Limoncello Syrup

Panna Cotta with Blueberry Limoncello Syrup

I love Panna Cotta, the creamy Italian vanilla flavoured dessert, but I haven’t tried making it before.

Then Sainsbury’s got in touch to ask if I would like to try one of their 'Make Your Own' panna cotta packs.


Well, having looked at the method for making panna cotta, which incidentally translates as ‘cooked cream’ in Italian, the MYO version sounded like a cinch.


The postie had shoved the box of panna cotta through my letterbox, but the contents were still intact. It was essentially a bag of powder to which you added semi-skimmed milk and double cream. My semi-skimmed was getting a bit low so I opted for my almond milk instead to go with the cream.

I added it all to the saucepan, brought it to a boil and the simmered for a couple of minutes before pouring them mix into my chosen moulds. I had intended to get some heart shaped moulds to tie in with Valentine ’s Day, but could I find any? Could I heck!

Panna Cotta with Blueberry Limoncello Syrup

So, instead I rummaged through my cupboards and found some silicone cupcake cases. The box said there were 4 servings inside, but I got 7 smaller portions using the cupcake cases. I chilled them in the fridge for a few hours and then to unmould, I popped the cases in some warm water for a few seconds, to ‘melt’ the outside a little.


To accompany my ‘mini’ panna cottas, I made a tangy syrup out of fresh blueberries and one of my favourite liquers, limoncello – another Italian element to this dish! Blueberry and lemons are a great combination. I boiled some blueberries with water until they popped and reduced a bit, before adding limoncello and let this burn off a little.

The syrup was fruity and sharp – a perfect contrast to the sweet and creamy pudding.

Panna Cotta with Blueberry Limoncello Syrup

Sainsbury’s MYO version certainly saved time and resulted in quite a fancy dessert!

Here’s how I made the syrup.

Blueberry and Limoncello Syrup


Thumbnail Url Fresh blueberries and limoncello liquer make this tempting slightly naughty syrup
Cuisine: Dessert Category: Sauce Yields: 7 mini
Prep Time: Chill Time: Total Time:


Ingredients
  • 100 grams fresh blueberries
  • 2 tablespoons water
  • 6 tablespoons limoncello liquer
 
Instructions
  1. Place the blueberries and water in a saucepan and over medium heat stir until the berries have popped and the mixture is thicker and purple in colour.
  2. Add the limoncello and simmer for about 3 minutes. Allow the syrup to cool before pouring over your panna cotta.

Panna Cotta recipe from Luca at Chestnuts and Truffles

Disclosure Statement: I received the panna cotta mix free to review. I also received a Sainsbury's gift voucher. Any opinions expressed are entirely my own.

Monday, 2 February 2015

Pear and Courgette Cake with Salted Caramac Frosting

Pear and Courgette Cake with Salted Caramac Frosting

Aaaaand…we are back into naughtier bakes again! February is upon us, and that means we can indulge again a little doesn’t it?

To be honest this cake, I made in January just over a week ago. We were invited to my cousin’s for Burn’s Night (it’s a Scottish thing –check it out if you haven’t heard of it) and I said I would provide dessert.

As you know, I like to try the unusual and I really wanted to make something which would leave the others guessing what they were eating. I looked online for some inspiration and came up with the idea of a pear and courgette cake (or zucchini depending which side of the Atlantic you are on).


The recipe I based it on used carrots, but I wondered what the addition of the green cucumber like vegetable would be like. The cake called for lots of canned pears, dried cranberries and chopped walnuts. Plus some spices which you added to the usual cakey ingredients – fat, sugar and eggs.


The cake was very liquid when I poured it into the cake pans and I was worried! Would it be too moist? After I baked it a skewer came out clean, I left them in the pans for a bit. When I turned them out, I thought they’d flop everywhere but they kept their shape.


I decided to also use another ingredient for the buttercream which I was going to decorate the cake with. Instead of white chocolate frosting I used caramac bars. The sweet, slightly caramel like light ‘chocolate’ bars. And for added ‘showyoffedness’ I added some ground up rock salt making it a ‘salted caramac’ frosting. And since I have made this, I heard Chris Evans on the Radio 2 Breakfast Show talk about Caramacs, then Kevin at ‘The Crafty Larder’ mentioned them in a post. Maybe they are due a resurgence.

Pear and Courgette Cake with Salted Caramac Frosting

As for the verdict on the cake? My mum initially thought it was ‘clootie dumpling’ (another Scottish thing – check it out). No one guessed there was courgette in it, but everyone loved it. I took some into work and my good friend Joanne actually said it was the loveliest thing I’d made – and I’ve taken quite a lot into work!


The cake, as I said, is moist with a capital M. The inside isn’t the most photogenic and doesn’t do it justice. But if you make it, take my word for it – you will LOVE it!!


Pear and Courgette Cake with Salted Caramac Frosting


Thumbnail Url Moist fruity cake with a sweet buttercream
Adapted from eatcannedpears.com
Cuisine: Dessert Category: Cake Yields: 1 layer cake
Prep Time: Cook Time: Total Time:
 
Ingredients
Cake Ingredients:
  • 680 grams grated courgette
  • 1 kilogram canned pears, drained and cubed
  • 140 grams dried cranberries
  • 140 grams chopped walnuts
  • 300 grams plain flour
  • 1 tablespoon bicarbonate of soda
  • 1 ½ teaspoon cinnamon
  • ½ teaspoon ground cloves
  • 1 teaspoon salt
  • 5 big eggs
  • 280 grams granulated sugar
  • 280 grams dark brown sugar
  • 250 ml vegetable oil

Buttercream Ingredients:
  • 100 grams unsalted butter, softened
  • 250 grams icing sugar
  • 120g grams caramac bars
  • 1 tablespoon milk
  • 2 teaspoon rock salt
  • 30 grams caramac for decoration
 
Instructions
Cake Method:
  • Preheat the oven to 180C and line, grease and flour 3 8” round cake tins.
  • In a large bowl, mix together the grated courgette, chopped pears, cranberries and walnuts.
  • In another bowl whisk together the flour, bicarb, cinnamon, cloves and salt.
  • In a large bowl, beat together the oil and sugars until creamy. Add the eggs and beat until slightly thickened in texture.
  • Add the flour mix to the wet ingredients and stir through.
  • Add the courgette/pear mix and fold through.
  • Divide the batter between the three pans equally and bake in the oven for 30 to 35 minutes or until a skewer comes out clean from the centre.
  • Allow to cool slightly before removing from the tin.

Buttercream Method:
  • Beat the butter and icing sugar together until creamy. Add the milk and stir through.
  • Melt the 120 grams of caramac, in the microwave, and let cool slightly before adding to the icing mix. Fold it in.
  • Spread one third of the mix on top of each cake, then stack them up. Decorate the top layer with broken bits of caramac and sprinkle with the salt.
  • Refrigerate until ready to enjoy.


Saturday, 31 January 2015

Blueberry Muffin Smoothie

blueberry muffin smoothie

This is an ultra-quick post today as I’m puppy-sitting for Jac from Tinned Tomatoes. The wee man is sleeping, so I am grabbing the chance to write this before he wakes up. Shhhhh!

This smoothie, for healthy January, kind of tastes like a blueberry muffin – hence the name. As you know, I love to make smoothies, which are reminiscent of cakes and desserts and this one is no exception.

blueberry muffin smoothie


Aside from blueberries, I added a banana for sweetness, plus white grapes too. I used almond milk and added a splash of vanilla extract and almond extract. The almond extract is not everyones cup of tea, but does add a cakeyness to the drink.


I whizzed up the ingredients in my Optimum 9400 from Froothie and the drink was ready in no time. Here’s the recipe…

Yield: 2 glasses
Ingredients:
250 grams fresh blueberries
1 large ripe banana
200 grams white grapes
250 ml almond milk (or any milk you prefer)
2 teaspoon vanilla extract
½ teaspoon almond extract

Method:
Whizz all the ingredeints together in a blender until smooth. Pour into glasses, over ice if preferred, and enjoy!


Disclosure Statement: I received the blender free to review. Any opinions expressed are my own.

Thursday, 29 January 2015

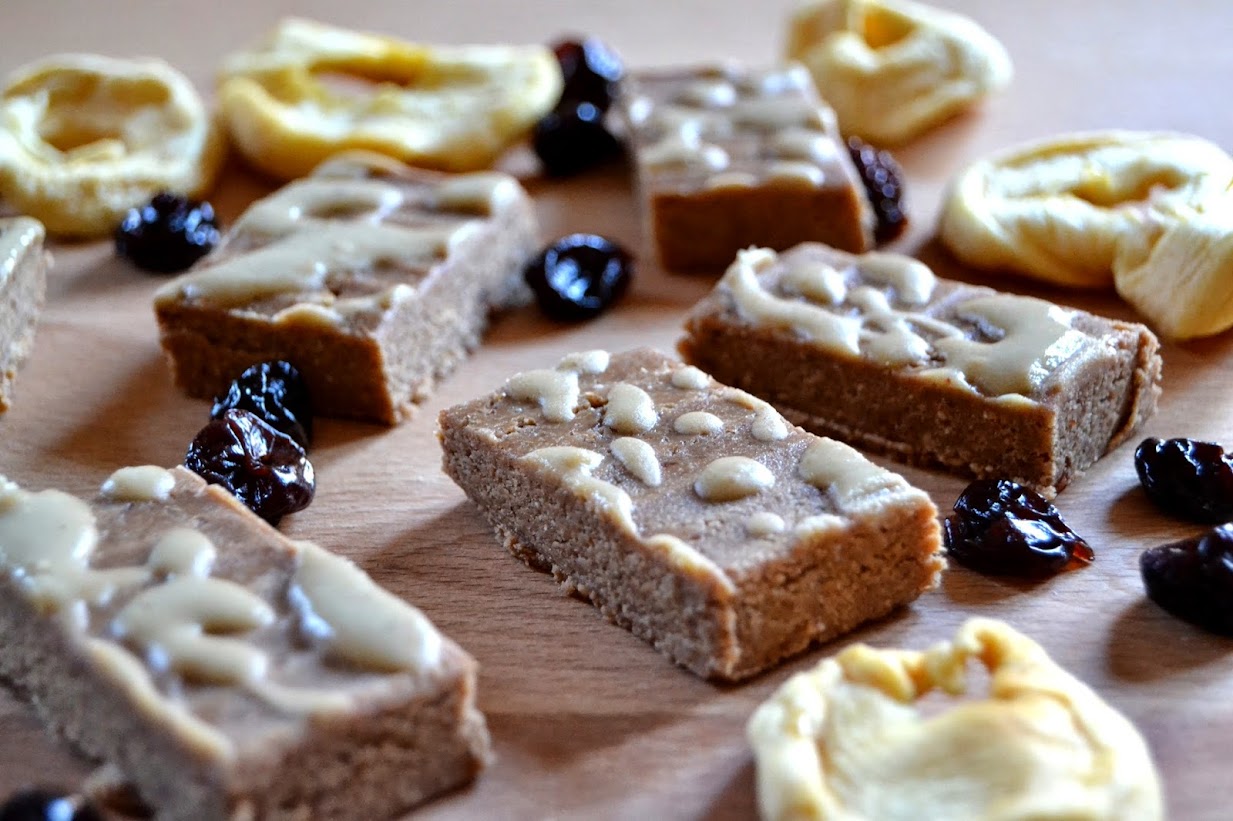
Apple & Sour Cherry Oatie Protein Bars

Apple and Sour Cherry Oatie Protein Bars

My healthier recipe January is nearing an end, but I am going to carry on with the occasional healthy bake, much as I did last year.

My penultimate post for January is for Apple and Sour Cherry Oatie Protein Bars. These were a complete experiment after visiting my local health food store. I picked up a few ingredients I liked the sound of and wound up with these bars.

Apple and Sour Cherry Oatie Protein Bars

They are perfect to get a hit of protein without eating too much. They include a vanilla protein powder and are full of oats. I love oats and decided to grind some up in my Optimum 9400 from Froothie to get oat flour. It only took about 30 seconds and I had fine flour. I’d seen it used in other posts and loved the colour it gave to bars.


The other ingredients I picked up were dried apple rings, which were squidgy – not hard. Plus some dried sour cherries packed with flavour.  I also added some ground cinnamon and used almond milk to loosen the mix up a bit.

The bars chilled in the fridge for a couple of hours to set up. And they cut up into little oblongs, making a satisfyingly squidgy bar. They hold their shape well, but are quite soft and chewy.

You could top with a little chocolate, if you like. I added the remainder of the pack of protein powder mixed with a little almond milk, almost like an icing.

  • Apple and Sour Cherry Oatie Protein Bars


    Apple Sour Cherry Oatie Protein Bars Protein bars full of apple and cherry flavour

    Cuisine: Healthy Category: Bars Yields: 12 bars approx.
    Prep Time: Chill Time: Total Time:


    Ingredients
    • 80 grams of porridge oats
    • 60 grams of dried apple rings
    • 30 grams vanilla flavoured protein powder
    • 3 tablespoon almond milk
    • ½ teaspoon cinnamon
    • 50 grams of dried sour cherries
     
    Instructions
    1. Place the oats in a blender and whizz until they are a fine flour. Next add the apple rings, protein powder and cinnamon. Blend until the mixture breaks down and begins to form a ‘dough’. Add milk, one tablespoon at a time to loosen the mix up as needed. Lastly add the sour cherries and blend them in. If little pieces show through – that’s fine.
    2. Take a plastic tub, about 6”x4” and line with greaseproof paper. Place the mix into the tub and press down firmly into an even layer. Place into the fridge for at least two hours, or preferably overnight.
    3. Cut the bars into 12 pieces and there you have bars ready to snack on whenever you need a protein boost.
    4. Happy healthy snacking!


Disclosure Statement: I received the Optimum 9400 free to review. Any opinions expressed are my own.

Monday, 26 January 2015

Treat Petite Round Up January 2015


My goodness! We are one month into 2015 already – where does time go?! January is a bit of a naff month don’t you think? It’s cold, we are all trying to be a bit heathier post-Christmas festivities. It’s still dark in the mornings when you leave for work and dark by the time you get back (well, for me anyway).

Anyway, enough of my grumbles! Treat Petite for this January was all about being a bit healthier like I said above. And you guys did not disappoint – who needs to be bad when being good can be so good?!


 To kick things off we have Luck, the Baking Queen, who gave us these delightful, swirly mini strawberry meringues. They only have 50 calories each and no fat! Great entry Lucy!


Secondly, it was me! I made cookies with no dairy-fats, no eggs, no sugar and lots of flavour. They contained low-fat peanut butter, cacao powder and a banana. They were very light and crisp and perfect for a nibble with a cuppa.


Laura at I’d Much Rather Bake Than made very tempting White Chocolate and Green Tea Shortbread Cookies. She ground up some tea leaves she was reviewing, and added them to her shortbread mix. They turned out a lovely subtle green hue and sounded delicious.


Elizabeth at Elizabeth’s Kitchen Diary has been getting all fit, and as part of her new routine she made these extremely healthy chocolate covered peanut protein bars, made with peanut flour. The chocolate on top is healthy too – cocoa powder with some coconut oil and maple syrup. They sound scrummy and virtuous at the same time.


Our antipodean pal Johanna, from the Green Gourmet Giraffe, who lives in Melbourne (where my in-laws are at the moment!) decided to make cashew cheese stuffed into dates. I have never heard of cashew cheese before and was intrigued. The cheese contains cashews, obviously, but I won’t spoil the surprise of the rest of the ingredients. Pop over and have a look yourself!


Claire at ‘What Claire Baked’ is getting all healthy for 2015 too and made healthy flapjacks with fruit and seeds. She said they aren’t as sweet as regular flapjacks, but you could always adjust the amount of honey used to sweeten things up. They look great.


Helen at ‘Family Food Friend’ made muesli cookies. She was recently given a couple of big bags of muesli and decided to incorporate some into these fab looking cookies. She did forget to add spices she says, but was quite happy without them!


My co-host Kat at The Baking Explorer made chocolate and peanut butter granola bars. I love chocolate and peanut butter together so these are right up my street! The no-bake bars contain lots of seeds and oats, organic peanut butter, and way less chocolate than you would find in a ‘candy bar’ so plenty of goodness packed in there!


It is amazing how many of us are now using coconut oil in our bakes – it really is very popular as well as being healthier. Kerry at ‘Kerry Cooks’ made healthier blueberry bran muffins. These contain, aside from the coconut oil, Greek yoghurt and oat bran. I would love these any day of the week for breakfast!


Corina at Searching for Spice made these Coconut, Apricot and Sultana Snack Balls, also with coconut oil. She used some leftover fruits from Christmas and voila – her balls were born. They look like they would provide tons of energy.


Camilla at ‘Fab Food 4 All’ made something akin to a crème brulee, but much healthier. It was a Fat Free Greek Yoghurt Fruit Brulee. Her son, who doesn’t like yoghurt, was surprised how much he loved it. Full of oranges and grapes, plus the yoghurt, it is a quick and tasty healthy treat to knock up.


Ness at Jibber Jabber UK was making me feel all festive with her Treat Petite entry. Her mincemeat and cranberry flapjacks were made using some leftover ingredients, plus mincemeat which the supermarket were selling at a bargain price. With oats and fruit, they provide lots of energy (and a touch of Christmas for those of us that are still missing it!).


Sarah Jane from ‘Takes from the Kitchen Shed’ made healthy digestive biscuits. With only maple syrup acting as the sweetener, plus spelt flour and oatmeal, these are really quite a heathy option, perfect with a cuppa.

There we have it - some healthier inspiration for us all. Thanks to everyone for taking part and stay tuned for February's Treat Petite over at The Baking Explorer.

Thursday, 22 January 2015

(healthier) Chocolate and Peanut Butter Popcorn

Chocolate Peanut Butter Popcorn

I love popcorn, it can be a great snack to eat when trying to be healthy as I’m sure you know. I have a popcorn maker which pops the kernels just with heat, which is the healthiest way to enjoy it, rather than tossing it in a pan with oil.

What can also make it not so healthy are the additional toppings ladled over it. Butter and caramel and other goodies can outdo the nutritious value of eating popcorn.

I decided to invent this recipe for Chocolate and Peanut Butter Popcorn, which contains no diary-fat and no refined sugars, as part of my healthier January drive.

But it turned out to use quite a bit of coconut butter, which is better for you than regular butter, but is still fat nonetheless. So I ended up halving the quantities for the topping of this popcorn and it didn’t take away from the deliciousness at all.

Chocolate Peanut Butter Popcorn

For lovers of chocolate and peanut butter together, this one is for you! The chocolate is made from raw cacao powder (unsweetened cocoa, if you can’t get hold if it), a bit of agave nectar for sweetness and coconut butter. The butter mixes with the cacao when molten, making a kind of choccy sauce. When cooled it sets a little, so your fingers don’t get all messy.

The peanut part came from raw peanuts, blended in my Optimum 9400, to make a natural peanut butter, with some added salt, agave nectar for sweetness and coconut butter which again helps it set a bit.

After popping the corn, I let it cool before adding the toppings. You could eat them straight away, or leave it a while and bag up to take to the cinema with you!

You will love this and it really isn’t too bad a way of getting your chocolate and peanut butter fix…

Yield: Several cups of popcorn

Ingredients:
70 grams popcorn kernels, popped

Chocolate sauce:
35 grams coconut butter
2 tablespoon raw cacao powder
2 teaspoon agave nectar

Peanut Butter coating:
20 grams coconut butter
100 grams raw peanuts
½ teaspoon salt
2 teaspoon agave nectar

Method:
Pop the popcorn kernels and leave the popcorn aside in a large bowl.

For the chocolate sauce melt the coconut butter in the microwave, in a small bowl. Add the cacao powder and agave nectar and stir until a sauce forms.


For the peanut butter coating, melt the coconut butter in  a microwave. Place the peanuts in a food blender, add the melt coconut butter, salt and agave nectar. Blitz until a smooth (ish) paste is formed.


Pour the chocolate sauce over the popcorn and toss it about so it’s all covered. Spoon the peanut butter coating all over and mix that through.


If you leave this to sit in a cool place, the chocolate and peanut butter sets a little and can be enjoyed on the go.


Happy Popping!

Monday, 19 January 2015

Red Velvet Smoothie

red velvet smoothie

Well, my fitness regime has started again – and so my healthier recipes continue!

I started back at the gym this weekend. I haven’t been for a good few weeks. My calves were killing me when running, so I splurged on a new pair of trainers from a shop the other day, which analyses your running style. Apparently I run like a gazelle?!

red velvet smoothie

To get the energy for my first run in a while I made another in my line of dessert flavoured smoothies, whipped up in my Optimum 9400 from Froothie.

red velvet smoothie

After trying some beetroot in a drink recently, I realised that it’s earthy flavour would go well with a bit of cacao powder in a smoothie and voila a red velvet smoothie was born in my head!

I gave it a whirl and was impressed with the tasty result. Also tucked in there is an apple, a very ripe banana, vanilla extract and almond milk. Okay, it’s not identical to a red velvet cake, but with the subtle chocolaty flavour, the vanilla and almond, plus the fruity sweetness, it tasted good and did the job before my run!

Give it a try – have your cake and drink it too!

Yield: Just under a litre!

Ingredients:
2 small beets, cooked – NOT PICKLED!
1 medium ripe banana
1 medium red apple, cored (keep the skin on)
1 tablespoon cacao powder
1 teaspoon vanilla extract
500 ml almond milk

Method:


Place all of the ingredients into a blender and blitz until completely smooth. The Optimum 9400 pulverises the apple skin, so no need to peel. Serve over ice if preferred.

Disclosure Statement: I was sent the Optimum 9400 free to review and have not been paid to promote it. Any opinions expressed are my own.