Saturday, 11 August 2012

Olympic Challenge – Europe – Baklava


Well, they are nearly over, and for not being much of a sport fan – I have become immersed in these Olympic games. We in the UK don’t do too badly for a wee island do we?

And for that last continent, there were a few suggestions of a British variety – but I really wanted to go back to where it all started. And thanks to Daz from Sydney for the suggestion of baklava – the quintessential Greek dessert. The Greeks gave us the Olympic games and this (yummy) dessert.

I have to say, I am not a fan of baklava, but I know many of my ‘eaters’ are. So I would have no problem giving them away. I’m just not a huge fan of pastry or honey, so it was quite strange making something I knew I wouldn’t enjoy.

I found a simple recipe at All Recipes, which had fewer ingredients than some, so might not be hugely authentic, but hey, you get the gist!


Yield: 36 little pastries

Ingredients:
One pack of filo pastry
16 ounces of chopped nuts (I mixed pistachios and walnuts)
225 grams unsalted butter, melted
1 teaspoon ground cinnamon
250 ml water
250 grams granulated sugar
1 teaspoon vanilla extract
110 grams of honey

Method:
Grease a 9”x9” baking pan and pre-heat your oven to 180oC.
Toss your nuts with the cinnamon and put to one side. Open your pack of filo pastry and measure it and cut it, so each sheet will fit perfectly in the pan. Place the pastry on a cutting board and cover with damp paper towels, so it doesn’t dry out.


Take one sheet of filo and place in the bottom of the pan. Taking a pastry brush, wash melted butter over the pastry and layer with another sheet, more butter and so on, until you have eight sheets stacked up. Next, sprinkle your nut and cinnamon mix over the pastry and begin to layer more pastry and butter for another eight sheets. Using a sharp knife, cut a criss-cross pattern on the pastry, cutting all the way through the layers. Pop into the over for 45 to 50 minutes.


Towards the last 20 minutes of baking, place the honey, water and sugar in a saucepan and bring to a boil, then simmer gently until the baking time is up. Remove the pan from the oven then immediately pour your syrup over the pastry, so it soaks into all of the cuts. Now leave this to cool for several hours.

When ready to eat, cut out the diamonds with a knife and enjoy. Now, as I said this is not my cup of tea, but my colleagues wolfed it down and thoroughly loved it. It is easy, so go ahead tuck in!


There we have it - Olympic Challenge completed - From Oceania to Europe - the world really isn't that big now is it? Thanks again to all those who submitted suggestions!

Thursday, 9 August 2012

Olympic Challenge – Africa – Granadilla Fridge Tart


Well, I figured Africa was always going to be the trickiest continent. And there was a dearth of responses for this one, until a new foodie friend messaged me to say that she had some South African treats on her site. Her name is Gem and you can visit her wonderful site here Cupcake Crazy Gem.

Initially she suggested a South African Peppermint CrispFridge Tart which looked amazing, but sadly living in the north east of Scotland some of the ingredients were not easy to come by. But on Gem’s recipe page right above the Peppermint Crisp was the word Granadilla. This intrigued me and I looked closer. It turns out a granadilla is a South African variety of passion fruit and the Granadilla Fridge Tart incorporates jelly, evaporated milk, crushed biscuits and of course the ubiquitous granadilla – only Gem made hers with passion fruit. And I thought why not? I changed mines a little bit from Gem’s, but not too radically. First, I decided to make individual portions, in little glasses. Any flavour of jelly is fine apparently, and Disneyboi loves lime, so I plumped for that and some real lime to decorate. I also went for light evaporated milk, and light digestives – well, I have to think about the waistline with all this baking!

The recipe is super easy and as the name suggests, no baking, just a refrigerator required!

Yield: 4 individual portions

Ingredients:
1 block of lime jelly, made and left to cool
1 400g tin of light evaporated milk, chilled
2 tablespoons granulated sweetener
Half a large pack of light digestives, crushed
Pulp from 6 passion fruits
Chopped lime to decorate

                                                      Method:
With a mixer, whip the evaporated milk for a few minutes, until it seems thicker and aerated, sprinkling on the sweetener whilst doing so. Next, pour on the cooled lime jelly, and combine.


In your glass, sprinkle a layer of crushed digestives, add some of the milk, jelly mixture and top with some of the passion fruit pulp. Repeat until the glass is full. My glasses managed three layers in total. Pop into the fridge and let set for several hours. When ready to serve, sprinkle with some reserved crushed digestives, a wee dollop of passion fruit pulp and a couple of wedges of lime.


The dessert is like a blancmange frothy type sweet, with crunch from the biscuits and pop from the passion fruit pulp. It really is very easy to make and exceptionally delicious. I just hope my small variations have done justice to Gem’s version! Thanks again Gem….now tuck in!


Monday, 6 August 2012

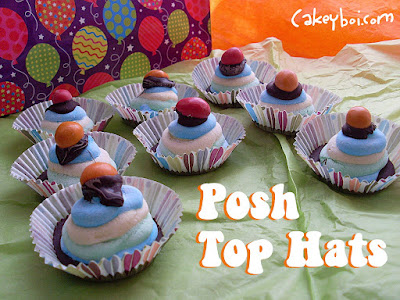
Posh Top Hats


marshmallow chocolate


You may have seen my recent recipe for Golden Syrup Marshmallows. If not, don’t worry, you can check it out here! But I was so impressed with the results, I wanted to try pimping my mallows.

Growing up, at birthday parties, a staple on the food table was a creation called Top Hats – a petit four case with a small amount of chocolate in the bottom, a marshmallow placed in that, then a wee dollop of chocolate on top of the mallow, finished off with a smartie (orange ones were always the best!). Now these were always my favourite at parties and I wondered if these could translate well to the adult world – why should kids tea parties have all the fun?


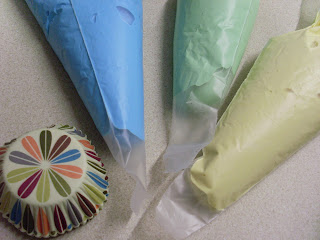
So armed with my marshmallow recipe (see link above) I divided the mallow mix into three and coloured each division in colours that matched my nice new cupcakes cases. I wanted to use cupcake cases, as the petit four ones were always too small – so why not make a larger grown -up size?? I put the mallow mix into three icing bags. I had drawn circles on a piece of greaseproof paper which were slightly smaller than the cupcake bases and proceeded to pipe circles in decreasing sizes on the greased paper, resulting in multi-colour mallow pyramids. I dusted these liberally with my combo of icing sugar and cornflour and left them overnight.


The next day, they were nice and set. So I gently peeled each one from the paper and dusted again lightly. I then took some melted plain chocolate and spooned a small amount into the cases and placed the mallows on top. I then finished each one off with a small amount of chocolate on top. Now I looked for Giant Smarties and could not find them anywhere – have they been discontinued I wondered? So I opted for peanut M&M’s instead, placed them on top and let the chocolate set. The result was a chocolate mallow nutty mouthful of pleasure! Too good for the kids…


Sometimes I get blank faces when I say Top Hats – other people seem to have had their own names for them over the country and elsewhere – so I would love to know if you had ‘top hats’ and if you did – what did you call them?? Leave your answer below ta!


Saturday, 4 August 2012

Olympic Challenge – Asia – Chai Spice Cookies


These have to be the easiest cookies I've ever made. So easy that I don't have many photos to share. Thanks to everyone for their suggestions for the Asian part of the Olympic Challenge. Alexandra Cartharis suggested Japanese Mochi which look lovely, but the ingredients were too tricky to come by for me sadly! I also had suggestions of Agar Agar and Ice Kachang. I feel as if I have had an education in Asian desserts.

Linzi over at Lancashire Food however suggested a Chai cookie. Now as an avid Starbucks patron, I have had a fair few Chai Latte’s in my time and good old regular chai tea too. So I thought this would be a good nod and a wink to the flavours of Asia. The cookies can be made well in advance and kept in the fridge, wrapped in clingfilm, until ready to bake.

Easy Chai Spice Refrigerator Cookies

Yield: approx 16 cookies

Ingredients:
110 grams unsalted butter, softened
60 grams granulated sugar
1 teaspoon vanilla extract
125 grams plain flour
½ teaspoon ground cinnamon
½ teaspoon ground ginger
½ teaspoon ground cloves
½ teaspoon ground cardamom
Some milk on stand-by

Cream together the butter and sugar until pale yellow in colour, add in the vanilla. In a separate bowl sift together the flour and spices. Add the flour mix to the butter mix and combine into a dough. If it seems too dry, add a wee spot of milk, but just a half teaspoon or so. Now place the dough onto a piece of Clingfilm and wrap it up. You can now press the dough into a log shape. Refrigerate for at least half an hour.


Have your oven pre-heated to 180oC and line a cookie sheet with baking paper. Remove the dough from the fridge and take off the Clingfilm. With a sharp knife, slice the log into quarter inch slices. Place the slices, hence forth your cookies, onto the cookie sheet and bake in the oven for around 10 to 12 minutes, or until the edges turn golden brown. Remove from the oven and allow to cool completely.

The cookies are like a spiced shortbread. They have lovely flavour, but I would be wary of too much cardamom as it can taste soapy, so don’t mis-measure! However, these are great with a cuppa and I devoured about 6 in one sitting!!! So go ahead, tuck in…


Thursday, 2 August 2012

Crunch Crust Brownie Bites with Dr. Oetker


The nice people over at Dr. Oetker recently sent me some baking goodies to try out.
I was lucky enough to be sent Double Chocolate Brownie Mix, white Chocolate Chips, vanilla flavour Easy Swirl Cupcake Icing and some Cake Release Spray.


I had recently read a few recipes which incorporated a crunchy bottom to their boxed brownie mix. I thought this would be a nice contrast to the fudgy chocolate brownies, so decided to tweak the box mix using some more ingredients and came up with Crunch Crust Brownie Bites.

Inspired by cooks.com

Yield: approx. 24 brownie bites

Base Ingredients:
25 grams chopped hazelnuts (or nuts of your choice)
60 grams of crushed digestive biscuits
60 grams light brown sugar
60 grams melted unsalted butter

Brownie Ingredients:
Dr Oetker Double Chocolate Brownie Mix
60 ml Vegetable Oil
30ml Water
1 Egg
Dr Oetker White Chocolate Chips

Topping:
Dr Oetker Easy Swirl Cupcake Icing
Reserved Chocolate Chunks from the Brownie Mix

Method:
Preheat your oven to 180oC. Spray a 9”x9” baking pan with the Dr. Oetker Cake Release Spray. In a bowl mix together the chopped nuts, digestives, sugar and butter with a fork until well combined. Transfer this to the baking pan and flatten down until the base of the pan is covered and the mix is level.


In another bowl , make the brownie mix as directed on the box. However, don’t add the bag of chocolate chunks provided in the box, keep these aside. Instead mix in a whole bag of the Dr Oetker white chocolate chips. 


Stir to combine and pour the mix over the biscuit base. Be careful not to mess up the base whilst smoothing it out. Pop this into your oven for 25 to 30 minutes, then remove from your oven and allow to cool. They came out of the pan very easily – so the cake release spray is definitely a winner (TIP! Also spray it on to spoons before measuring syrup or honey, which then slides off a treat).

I cut the brownies up into bars and decorated each one with a swirl of the cupcake frosting. For a final flourish I took the reserved chocolate chunks and chopped them up with a knife. I sprinkled these over the icing. The brownies would be great to serve at a party for a light sweet bite!

The brownies were delicious, very chocolaty and gooey in the middle as brownies should be. If you like them even fudgier, bake them for a couple of minutes less than directed. The white chocolate chips were a nice touch, keeping their shape when baked. The crunchy biscuit bottom was a nice contrast to the brownies and provided a buttery, nutty flavour too.

Sadly I was not a big fan of the swirl icing. It had a very artificial taste and a greasy consistency that I didn’t personally like. However it would be good if you are in a rush, it is easy to use and it comes with four tips to give you different icing effects.

Check out the Dr. Oetker website for their full range of baking products.


Disclosure Statement: I received the ingredients free, to review them. I was not required to write a positive review. The opinions expressed are my own.

Wednesday, 1 August 2012