Thursday, 10 September 2015

Carrot Cake Semi-Fondant Fancies

Carrot Cake Fondant Fancies

It was my mum’s birthday the other week and as usual I made her a carrot cake to celebrate the occasion.

She loves her carrot cake and over the past few years, I have tried putting different spins on the classic cake we all know and love. For example I’ve made a carrot cake swiss roll and a carrot cake meringue pie over the past couple of years.


Carrot Cake Fondant Fancies

This year I took some inspiration from a bake I hade made a couple of months back, my banana bread fondant fancies. These were little squares of banana bread, topped with a sheet of fondant and iced with chocolate. They went down a storm.


So I whipped up a carrot sheet cake, inspired by a recipe from ‘Taste of Home’ and let it sit out for a day to get firm. It’s better to let the cake get firmer before icing as it doesn’t fall apart the same.


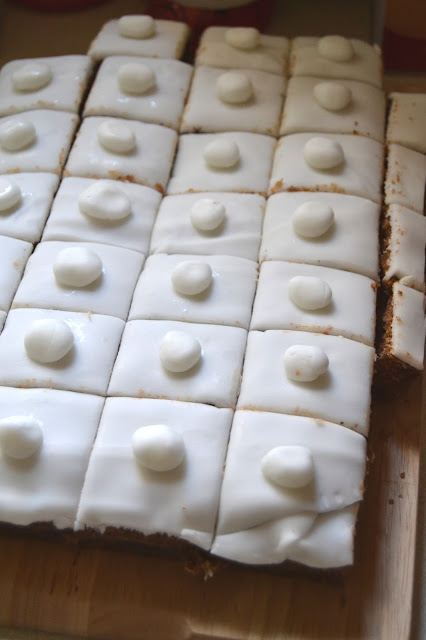
I topped the sheet cake with some ready rolled fondant and then cut it into squares. With some leftover fondant I rolled into small balls and stuck to the top of each square.


From the name of the bake, you can probably guess that things didn’t quite go to plan. I thought I had nothing better to do than make the same chocolate frosting I had for the banana bread fancies, but use white chocolate instead of plain. Big mistake!


The cocoa solids in plain and white chocolate vary wildly meaning my batch of icing was way too runny. I added more icing sugar and had to refrigerate it until it was a better consistency.

It is a painstaking process covering each square in icing, and I genuinely ran out of time to cover each one, so I settled for icing the tops, which ran down the sides of some of them. I also added a squiggle of orange icing for a bit of decoration. Semi-decorated…


These need to set overnight, so do make them well in advance if trying this out.

Carrot Cake Fondant Fancies

Carrot Cake Fondant Fancies


Thumbnail Url Carrot cake topped with
fondant and dipped in a white choc icing
Cuisine: Dessert Category: Petit Four Yields: 28 fancies
Prep Time: Cook Time: Total Time:
 

Ingredients
  • 4 large eggs
  • 250 ml vegetable oil
  • 1 teaspoon vanilla extract
  • 450 grams granulated sugar
  • 200 grams plain flour
  • 2 teaspoons bicarbonate of soda
  • ¼ teaspoon baking powder
  • 2 teaspoons ground cinnamon
  • ½ teaspoon salt
  • 150 grams grated carrot
  • 85 grams chopped walnuts
  • 1 pack of ready rolled fondant icing
  • Apricot jam/Syrup/Agave Nectar or similar
  • 150 grams white chocolate, chopped
  • 37 grams unsalted butter
  • 6 tablespoons water
  • 240 grams icing sugar
  • More icing sugar and orange food colouring for decoration.
 
Instructions
  1. Preheat the oven to 180C and line a 9”x13” baking pan with greaseproof paper.
  2. In a bowl sieve together the flour, bicarb, baking powder, cinnamon and salt.
  3. In a larger bowl whisk together the eggs, vegetable oil, vanilla and granulated sugar until smooth.
  4. Add the flour mix and mix until the ingredients are incorporated.
  5. Add the carrots and walnuts and stir through.
  6. Pour into the prepared baking pan and bake for 30 to 35 minutes or until a toothpick comes out clean from the centre.
  7. Allow to cool fully.
  8. When cooled, brush the top with warmed jam or syrup then place the rolled fondant on top.
  9. Press the fondant down and cut excess from the edges. Keep the excess fondant.
  10. Carefully cut into 28 squares with a long sharp knife.
  11. Divide the leftover fondant into 28 small balls and adhere to the top of each square using water.
  12. Make the icing by melting the chocolate with the butter and water, in a bowl over a saucepan of simmering water.
  13. Stir in the icing sugar until smooth. Refrigerate for at least 2 hours to let the icing get to a dippable consistency.
  14. Dip the top of each fancy into the icing and carefully coat the edges too (unlike I did). Place on a wire rack for excess to drip off.
  15. Mix some icing sugar, water and orange food colouring to a drizzling consistency and drizzle over the fancies.
  16. Allow to dry out overnight.


Monday, 7 September 2015

Iron Brew Macaron

iron brew flavour french macaron

Did you know that Scotland is the only country in the world where Coca-Cola is not the top selling soft drink?

That is because Scottish drink Iron Brew, or Irn Bru as it says on the cans, is the nation’s favourite here. I like it, can’t say I drink it all the time, but it is a very different drink.

It’s has ammonium ferric citrate (thanks Wikipedia) in it, which I think gives it the Iron name…

image source
Recently I was watching  Martha Stewart videos, and a clip about no-fail French macaron making. It was with the handsome Thomas Joseph who has a great series on Martha’s website called ‘Kitchen Conundrums’ that goes into the science of cooking and baking.

I try and I  try, but I cannot make macarons very well, and thought to myself I really must give this recipe a go.

image source

What do these two things have in common? Well, I had Iron Brew flavouring in the pantry and a desire to make macaron after seeing the video –as you can guess, I decided to make Iron Brew Macaron.

iron brew flavour french macaron


The recipe makes a very thick macaron batter, thicker than I have seen on other tutorials and I wondered if this may be the reason this is a no-fail recipe. I flavoured the mix with the Iron Brew extract, which you can easily find online, and added some orange colouring before piping it onto a lined baking tray.


As it was thicker, it didn’t smooth out liked I hoped it would. They do look a little rustic, I know, a bit lumpy-bumpy. But the baked result was really, really delicious.

I sandwiched the macarons together with some buttercream which I had dyed blue. The blue and orange are the colours of the Irn Bru can, that’s what I was going for there. I probably would add a bit more orange next time.

iron brew flavour french macaron

I have to say these are the best macarons I have made thus far and have Thomas Joseph to thank for that. You can follow the recipe, which I have converted to UK measurements, and add whatever flavourings or colours you like.

iron brew flavour french macaron


They were soft and crisp and had a subtle Iron Brew flavour which all my tasters loved. Here’s how I made them…

Iron Brew Macaron


Thumbnail Url French Macaron flavoured
with Scottish Iron Brew
Cuisine: Petit Four Category: Macaron Yields: 20-25 macaron
Prep Time: Cook Time: Total Time:


Ingredients
  • 70 grams ground almonds
  • 115 grams icing sugar
  • 2 large egg whites, room temperature
  • 50 grams granulated sugar
  • 2 teaspoon Iron Brew extract
  • Orange food colouring paste
  • Blue food colouring paste
  • 100 grams unsalted butter, softened
  • 50 grams icing sugar
 
Instructions
  1. Preheat the oven to 180C and place the oven rack to the lowest part of the oven.
  2. In a food processor, blitz together the ground almonds and 115 grams icing sugar for one minute.
  3. Transfer to a sieve and pass through until all you are left with are larger pieces in the sieve.
  4. Blitz the remaining crumbs again and repeat the process until all but a teaspoon or so is left after re-sieving.
  5. In the bowl of a food mixer place the egg whites and granulated sugar. Beat together by hand, before beating on high in the food mixer for 5 minutes. The egg whites should be thick and glossy.
  6. Add the 1 teaspoon of the extract and orange colouring (as much as you like). Stir these through
  7. Fold the almond mix in the egg white mix, gently, so you don’t deflate the egg whites.
  8. Transfer to a piping bag and pipe onto a baking tray lined with greaseproof paper. The rounds should be between just shy of an inch in diameter.
  9. Smack the baking tray off the worktop to get rid of any air bubbles.
  10. Place into the oven and bake for 13 minutes approximately.
  11. Allow to cool completely.
  12. Beat together the softened butter, 50 grams of granulated sugar, 1 teaspoon of iron brew extract and blue food colouring (amount will depend on colour you prefer).


Saturday, 5 September 2015

Saturday Swally with Beer52 (and a discount code)


Saturday Swally (swally - def: pronounced as in alley and not wally, is a Scottish term for a beverage normally alcoholic in nature) - a wee feature where I post about boozy treats I have been sent to sample!

I was very excited when I was approached by Beer52 to see if I would like to try out a box of beer. Of course I said yes.


Beer52 is the UK’s No. 1 craft beer club, offering subscribers a delivery each month of 8 small batch beers specially selected by their expert panel of beer tasters.


I love craft beer. It’s something I never thought I would ever hear myself saying, as when I was younger I did not like beer at all. I always drank cider, probably as I have such a sweet-tooth. Then I did get into lagers gradually when I was a student (snakebite and black was poor segue bit it worked).


However, I have now even gone off lagers finding them too gassy and flavourless. My tastes have now veered to pale ales, craft beers, that sort of thing. So the opportunity to try a box of hand-picked craft beers from around the world seemed too good to turn down.


When you subscribe to Beer52, you receive a box, well packaged so no broken bottles guaranteed, which contains a mix of this month's cans and bottles of the beer plus a copy of Ferment, Beer52’s magazine which describes the drinks on offer. Also in the box is a snack to enjoy with your beers – in mine was a bag of chilli popcorn crisps – very tasty.


Disneyboi and I have tried some of the beers over the past couple of weeks and can say we have not been disappointed yet. The range of flavours has been extremely wide, from fruit salad to coffee and chocolate. These are beers you mightn't get to try elsewhere, so opening the box, is a bit of an adventure.


Aside from the great taste of the beers, I love the different microbreweries way of packaging their bottles and cans. Marketing a bottle in the right way can ensure that a product stands out in a busy marketplace, so having the right look and message on your product is very important.


If you would like to subscribe to Beer52 yourself, it costs £24 for one month. However, you can subscribe for 3 months at £23 a case per month, £22 per month for 6 months or £21 a month for a year. This will provide you with a box of 8 different craft beers each time.


There are well over 12, 000 microbreweries worldwide Beer52 choose from and the number is ever growing so you can ensure you will always get something different.


I am very excited to be able to give you, Cakeyboi reader, a special code for 10% off your first box from Beer52. Simply head to the website and when asked for a promotional code enter CAKEYBOI10 .

Disclosure Statement: I received the box of Beer52's craft beers free to review. I Have not been paid to write this post and any opinions expressed are my own.

Thursday, 3 September 2015

Breakfast Power Smoothie


Are you torn over what to have in the morning? Do you want a hit of caffeine to get you going, or do you want to have a health-packed smoothie full of nutrients and vitamins to start your day?


It’s a tough choice, and if like me you hanker after a cuppa joe, feeling guilty, this recipe could solve all that.


It’s a smoothie which contains healthy coconut water, good for this ol’ electrolytes, a banana, bundled full of potassium and baby spinach kicking and screaming with iron.


The added bonus here however is the addition of a shot of coffee. Strange I know, but the flavours of all these ingredients together work well, giving the smoothie a depth of flavour which is quite unique.


For the coffee I used a single serve stick of microground instant coffee. I’m finding these ‘sticks’ of coffee harder to come by these days, I think the manufacturers are all phasing them out, but a spoonful of microground instant would work the same.


I popped all the ingredients into my Froothie Optimum 9400 blender, and whizzed the ingredients together. The coffee is immediately blended into the drink due to the sheer power of the blender.


This drink is also perfect if you are suffering from a hangover – it gives you a caffeine boost and also cleanses the body with all of the nutrients.


Why not give this a try tomorrow morning and see if it makes a difference to how you start your day….


Here’s how I made two servings.

Breakfast Power Smoothie


Thumbnail UrlSmoothie packed with iron, caffeine and other
great things to get you started

Cuisine:DrinkCategory:SmoothieYields:2 glasses
Prep Time:Cook Time:Total Time:
 
Ingredients
  • 2 medium bananas
  • 500 ml coconut water
  • 3 large handfuls of baby spinach (more if you like)
  • 2 sticks of instant microground coffee (or 15 grams)

 
Instructions
  1. Whizz all of the ingredients together in a blender and pour into your favourite glass.
  2. Enjoy on your way to work.


Monday, 31 August 2015

Treat Petite - September 2015


I can’t believe that Treat Petite is now 2 years old!

Thanks to everyone who has taken part in our little challenge over the past couple of years and last month too - check out our GBBO entries over on Kat's page. Our aim was to celebrate everything that wasn’t a big honking cake, or pudding, loaf or whatever. Just smaller, petite treats – hence the name.


As you may know, I was a host for the Clandestine Cake Club in Dundee, but we have broken away from the official CCC and started up our own Dundee Baking Club. That way we can bring along baked goods which aren’t just cake – very much in the spirit of Treat Petite - which all our bakers seem very excited about. If you live in the Dundee area or surrounding towns, why not drop me an email if you are interested in joining?

Anyhoo, September is here and we are sticking with tradition and as with the past two Sept’s we are sticking with ‘Anything Goes’ as a theme.


That means no theme really, just anything that isn’t a big cake, pudding, loaf etc. For example a big trifle is a no-no, but individual trifles are a yes-yes!

The rules are below, and the only difference this month, is only one entry per blog please! Back to normal next month…

  • Add your petite treat to the Linky at the bottom of this post by the 25th of the month, midnight at the latest.
  • Post your bake onto your blog and link back to Cakeyboi and The Baking Explorer, stating who is hosting this month.
  • Follow Cakeyboi and The Baking Explorer blogs on Google + (see sidebar links), if you haven’t already.
  • If you tweet use  #treatpetite and mention @MrCakeyboi and @BakingExplorer – we will retweet Add the new challenge logo to the post and ‘Treat Petite’ as a label to the post
  • Use any recipe as long as the source is noted
  • If you like, add your photo to the ‘Treat Petite’ Pinterest board (request access from me – Cakeyboi)
  • Feel free to enter old posts as long as you update the post and meet all the requirements above!


Thursday, 27 August 2015

Peach Coconut Scones


Coconut oil is all the rage isn’t it? It’s the latest superfood – with so many health benefits, it’s a really versatile product that it can be used in many ways.

I was recently sent some by Vita Coco, in a lovely wee gift box which had a big jar of the oil and a smaller jar.

The little jar we have been using as a moisturiser, see what I mean about versatile!


With the larger jar of coconut oil I have been using it in cooking. This particular brand is cold-pressed, and retains a lot coconut flavour which other inferior brands don’t seem to.

As it has that lovely coconut taste, it is also good for spreading directly on toast or even stirring into a hot cup of coffee.

But as I said I have been using it in cooking. I fried onions in it for my Moroccan vegetable stew, and for this recipe I made scones.


I had peaches left over from my peachy lemon cake the other day, so decided to try making scones with the coconut oil instead of butter and adding chopped peaches. I also used maple sugar to sweeten things up, a natural sugar made from 100% maple syrup, and a wee bit of cinnamon. You could substitute brown sugar instead of maple here.

This combination made a soft scone dough which I actually baked in a greased cupcake tin, above. I could have cut them out individually yes, but I was being lazy and this seemed a much quicker option.


This resulted in perfectly baked scones, which I could have christened scuffins or cupcones or something, to keep in with the duffin, cronut trend, but decided to call them plain old, but tasty, scones.

They were perfect split, spread with a little butter, or even eaten on their own which Disneyboi did. All the flavours are subtle, no big whacks of coconut, cinnamon or maple, but they are meld together to compliment the peaches perfectly.

Here’s how I made them...

Peach Coconut Scones


Thumbnail Url Scones filled with peaches and made
with coconut oil
Cuisine: Snack Category: Scones Yields: 12 scones
Prep Time: Cook Time: Total Time:
 

Ingredients
  • 200 grams plain flour
  • ½ teaspoon salt
  • 50 grams brown or maple sugar
  • 1/8 teaspoon cinnamon
  • 1 tablespoon baking powder
  • 85 grams coconut oil
  • 2 large eggs
  • 85 grams 0% fat Greek yoghurt
  • ½ teaspoon vanilla extract
  • 250 grams canned peaches, chopped
  • Coarse sprinkling sugar
 
Instructions
  1. Preheat the oven to 180C and lightly grease a 12 cup, cupcake tin.
  2. In a large bowl, stir together the flour, salt, sugar, cinnamon and baking powder.
  3. Add the coconut oil, in solid form and rub this through the flour, until it looks like breadcrumbs.
  4. In a jug, beat together the eggs, yoghurt and vanilla extract.
  5. Add the wet ingredients to the dry and add the chopped peaches too.
  6. Mix until a dough forms, you may need to use your hands.
  7. Divide the mixture between the 12 sections of the cupcake tin. Sprinkle with the coarse sugar.
  8. Bake in the oven for 20 minutes or until golden brown.
  9. Remove from the oven and tip the scones out onto a cooling rack.
  10. Serve with a little butter.

Disclosure Statement: I was sent the coconut oil free to try. I was not asked to create a recipe. Any opinions expressed are my own.

Monday, 24 August 2015

Lemony Peach Cake


We were going to my cousin’s for a Saturday night pot luck sort of meal at the weekend. I, as you might expect, made dessert.

As were are still clinging onto the last gasps of summer, I wanted to make a sunny cake. Something light and delicious and fruity. And to me that spelled out peaches and lemon!


Don’t know why, but peaches and lemons conjure up sunniness and freshness, so off to the supermarket I popped for some. However I didn't go near the fresh fruit section, I got myself some canned peaches and some lemon extract. Cheating, I know.

I blended some peaches into a puree with my stick blender and folded this into the cake batter, adding some of the lemon extract. I baked this into two cake pans and when they were cooled, I split these into two, so I had four layers.


I then made a peachy, lemony buttercream too. I added some of the peach juice from the can to the buttercream and some more lemon extract.


I wanted to go for an ombre style icing effect, so coloured the buttercream into different shades, one batch natural, the others more yellowy and one pale orange. To get the effect, I put the coloured buttercream into disposable piping bags and piped the colours around before smoothing things off with a palette knife. Very simple, yet very effective.


I did sugar some lemon peel, I had a lemon kicking about the kitchen, to garnish the top, But that was about it. Everyone loved the cake and my mum grumbled at my meagre portions – she went back for seconds. Always a good sign.


Here’s how I made it.

Lemony Peach Cake


Thumbnail Url Cake with peach puree and lemon flavour
adapted from foodiebaker.com
Cuisine: Dessert Category: Cake Yields: 9" cake
Prep Time: Cook Time: Total Time:
 

Ingredients
  • 155 grams plain flour
  • 30 grams cornflour
  • 1 teaspoon baking powder
  • 1 teaspoon bicarbonate of soda
  • ½ teaspoon salt
  • 85 grams, unsalted butter, room temperature
  • 120 grams caster sugar
  • 1 medium egg
  • ½ teaspoon lemon extract
  • 125 grams peaches, pureed
  • 170 grams softened unsalted butter
  • 3 teaspoons peach juice
  • 750 grams icing sugar
  • ½ teaspoon lemon extract
  • Yellow and orange food colouring
 
Instructions
  1. Pre-heat the oven to 180C and grease and line two 9” round baking tins.
  2. Sift together the flour, cornflour, baking powder, bicarb and salt.
  3. In a separate bowl, cream together the butter and sugar until light and fluffy. Add the egg and beat this through, then add the lemon extract and beat this in too.
  4. Add the dry ingredient and stir until combined then lastly add the peach puree. Stir this through then divide the batter equally between the two pans.
  5. Bake in the centre of the oven for 25 to 30 minutes, until golden on top and a toothpick comes out clean from the centre. Allow to cool in the tins for 5 minutes before removing onto a cooling rack.
  6. Allow the cakes to cool completely and in the meantime make the buttercream by creaming together the 170 grams of butter, icing sugar, peach juice and lemon extract.
  7. Take one fifth of the buttercream and colour this pale orange and colour another fifth yellow.
  8. Split each layer of the cake into two and spread a layer of the uncoloured buttercream onto each, sandwiching them together. Spread a thin coating of the uncoloured buttercream all over the cake and refrigerate for an hour.
  9. After the hour, place the orange and yellow buttercreams into piping bags. Pipe these around the bottom and middle of the cake, Do the same for the top of the cake with the uncoloured buttercream.
  10. Go round the side of the cake with a palette knife, smoothing the buttercream. Clean the knife between each sweep of the cake.
  11. Refrigerate until ready to enjoy the cake.