Monday, 8 October 2012

Disney Cupcakes


Mickey mouse cupcakes


If you are a regular reader of my blog, then you may have wondered why I refer to my other half as Disneyboi. Well, the answer is simple – he has a part time job working in the Disney Store. He is an office monkey Monday to Friday, but come the weekend he dons his uniform and takes to the stage as a Disney Cast Member (all staff with Disney are called cast members).

The Disney Store in Dundee has now been open for 15 whole years and Disneyboi with his lovely colleague Nikki are the two longest serving cast members, having been there all 15 magical years. Recently, they threw a party for cast members – past and present - and I tasked myself to make some cupcakes for the event.

Actually, that same week, he asked me to bake for the MacMillan Coffee Morning in his office, so I combined the two! I decided to make Mickey shaped chocolate cookies, for the coffee morning, and use some of these for Disney cupcakes for the party.

I had bought the Mickey cookie cutter from the Disney Store in Oxford Street, when visiting London a few months back and hadn’t had the chance to use it yet. I wanted the cookies to be quite firm, a bit like Oreo biscuit, so they would hold up well, when plunged into the cupcakes. And I wanted the cupcakes to be in yellow paper cases, with red frosting, and mini mallows as the buttons, so they kinda looked like a deconstructed Mickey. I hope you think they do.

The cookie recipe I used was from All Recipes. I doubled the batch, which yielded about 80 Mickey heads. 50ish went to the office for charidee and  the rest would be used for the party.


I then found a very simple vanilla cupcake recipe from Kidspot, this made 12 cupcakes, not very many I know, but with some cookies left over, I didn’t think the ‘cast’ would mind.

When the cupcakes had cooled, I whipped up a batch of marshmallow fluffy frosting and dyed this red (I would have loved a darker colour, but I’d made too much fluff and it watered the colour down).


 I piped it on top, chopped some mini mallows in half and stuck them in the frosting to look like the buttons. I then made a slit in top of the cakes and tried to stick a whole cookie in the top, but it was too big. So, I attacked them with a knife and half cookies were placed on top. And I was quite impressed with the final result.


The party went with a swing that night and there was a near riot over who could have a cupcake – perhaps I should’ve made more! Lesson learned…


I am also entering these cupcakes for Cupcake Tuesday hosted by Hoosier Homemade.

Thursday, 4 October 2012

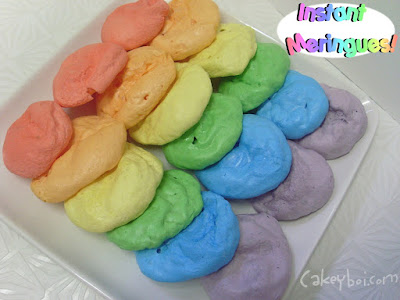
Instant Meringues


microwave meringues, rainbow meringues


I used to make these in the 1980’s – and hadn’t made them since. However, going through the Rolodex of my mind, for Cakeyboi purposes, I remembered these. They are very, very simple and fast to make and are almost a bit like kitchen alchemy, so a great one for the kids to try during the holidays.

As an annoying Food Network presenter would say, 'the essential tool you need for this recipe is a microwave oven'. I’m sure most of you do have one, so let’s begin!

In my picture, you will see I coloured my meringues, but this was for nothing but aesthetic purposes and you can leave them white, or just colour them once – not like the 6 batches I made!!

All you need are egg whites and lots of icing sugar. The rule of thumb is 15grams of egg white to 150grams of icing sugar. I also experimented with adding flavourings, but lets walk before we can run!

Place your egg white(s) into a large bowl – DO NOT WHISK. That’s right – no whisking involved. Just slowly add the icing sugar (and colouring if so inclined) to the egg white until you get a stiff, playdough like substance. It should be malleable so that you can work it into small balls. Give it a good knead to get it smooth.


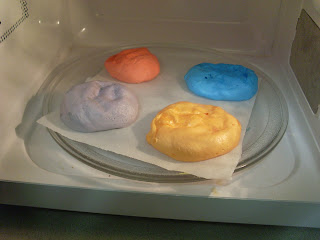
Place a square of baking paper onto the glass plate of your microwave and begin pinching balls of the sugar dough (try different sizes, but 10 gram balls work well) and roll them between your hands. Place 4 balls well apart on the paper (not in the middle) and zap for around 40 seconds in an 800watt oven. Times vary going by the size of the oven.


These balls will puff up before your eyes into light meringues. Place them on a cooling rack, as the bottoms are very hot.


Now, they don’t have the same texture as ‘normal’ meringues, they are lighter and crumblier, but are good for loading with whipped cream for example or just eating on their own. You could even crumble them into an Eton Mess, or sprinkle over Ice Cream.


Like I said, I added a drizzle of strawberry kiwi flavouring to mine, but this will affect how much icing sugar you need to use, to get the same consistency. Likewise with the food colourings ( I used paste, not liquid). But really, these are something, which is fun for kids to try, not always perfect, and may need tweaking depending on your microwave. And be warned, a small amount of dough makes a LOT!!!


Go on, get creative and enjoy!

Wednesday, 3 October 2012

Monday, 1 October 2012

Caipiroska Cookies


vodka lime brown sugar cookies


Since Disneyboi and I started going to Portugal a few years back, we have fallen in love with a drink which is served seemingly everywhere in the Algarve. Now, it is not actually Portuguese in origin, but Brazilian. Called Caipiroska, it is the same as the more commonly known Caipirinha – main components are a whole lime – pulverised, sugar, ice and vodka (rum for the Caipirinha). We usually have it with brown sugar and I thought these ingredients, including the vodka, would make lovely cookies.

I found a recipe for Tequila Lime Cookies at Today’s Nest and have tweaked it into something more akin to our beloved Caipiroskas.

Yield: Approx 40 cookies

Ingedients:
1 tablespoon corn syrup (or glucose syrup)
1 tablespoon vodka
230 grams plain flour
½ teaspoon bicarbonate of soda
Pinch of salt
115 grams unsalted butter, softened
100 grams light brown sugar
110 grams granulated sugar
Zest of three limes, approx 1 tablespoon
1 large egg

Method:
Preheat your oven to 180oC and line cookie sheets.
In a saucepan combine the syrup and vodka, and simmer until it has reduced and thickened a little, this should just take a couple of minutes. Let this cool.


In a bowl whisk together the flour, bicarb and salt. Set this aside. In the bowl of an electric mixer, cream the butter and sugars and add the lime zest. When totally combined, add the egg and mix through. Add the cooled syrup mix and combine, before slowly adding the flour. Mix the flour in until no streaks of white are seen. Place the cookie dough in some cling film, wrap it up and place in the fridge. Let this chill for about 20 minutes.


When chilled, break off pieces of the dough and roll into one-inch balls, placing them on the cookie sheets, with some space in between them. Pop into the oven for 10 to 12 minutes, until golden brown.  Remove and let cool completely. Repeat until all the dough has been used up.


To finish, I dusted over some icing sugar and some more lime zest. These cookies are very refreshing with the lime, there is a slight ‘something’ from the vodka and with the brown sugar, is just like eating a Caipiroska! If you want to, you could replace the vodka with rum and have Caipirinha cookies instead.
Enjoy and remember to eat responsibly!!


I am also entering this bake into this month's Calendar Cakes challenge hosted by Dolly Bakes and Laura Loves Cakes as the theme is Summer Lovin'.


Thursday, 27 September 2012

Lara Bars


Without going into detail, the end of September is a sad time for my family. Personally, it makes me think of the past and how things might have been.

When I came across something called Lara Bars online, I just knew I had to share them and at this time especially. This will not make sense to most people, but the two are related.

Anyhoo, Lara Bars I have discovered, are healthier sweet treats! Cakeyboi finally goes healthy I hear you cry. Well, personally I believe that everything is okay in moderation and what I usually make are more ‘sometimes’ treats rather than daily pleasures. But the Lara Bars can be made without fat or sugar or gluten, depending on what you put in them. So they are suitable for different types of dietary requirements, or are just nice if you want a sweet treat without much guilt.

The main component of Lara Bars is dates – now don’t click away!! I don’t like dates on their own, but you don’t taste dates in the Lara Bars. And the idea is that you add ingredients that you do like, such as nuts, other dried fruits etc. Stick with me honestly.


I decided to try making two varieties of Lara Bars – Peanut Butter Chocolate Chip and Coconut Lime flavours. The former does have a modest amount of dark chocolate so not too bad!

Peanut Butter Chocolate Chip Lara Bars

Ingredients:
175 grams pitted dates
125 grams low fat peanut butter (smooth or crunchy)
50 grams of dark chocolate chips

Method:
Place all of the ingredients in a food processor and blitz until everything is combined and has formed a sort of ‘dough’. Remove this from the processor and place onto a lightly greased baking pan or other container – I used an old plastic food storage box. Press down firmly on the ‘dough’ and shape into a square or rectangle. Place in the fridge for a couple of hours to set. 


Remove from the fridge,take the Lara Bar block from it’s receptacle – and place on a cutting board. With a sharp knife cut into squares, oblongs, triangles – whatever takes your fancy! The Lara Bars are ready to enjoy. These ones tasted just like squidgy, gooey Peanut Butter and Chocolate bars which I love!

Coconut Lime Lara Bars

Ingredients:
260 grams pitted dates
90 grams dessicated coconut
150 grams whole hazelnuts
Zest of 1 lime
1 tablespoon lime juice

Method:
Same as above, except I blitzed the nuts first to give them a head start, then added all the other ingredients and whizzed it up until a ball formed. Place this in a lightly greased receptacle and press firmly into shape. Fridge them for a couple of hours and then chop into bars when ready to eat. These are very fragrant with the fresh lime and have the buttery coconut undertones to compliment this.


Lara Bars are a great find and I will be thinking up other varieties to try over time. I do hope you try these, even if you don’t like dates. They are delicious!

Loved Adored Remembered Always

Wednesday, 26 September 2012

Monday, 24 September 2012

Portuguese Custard Tarts (Pasteis De Nata)


So, the holiday is well and truly over sadly. Back to sunny Scotland and almost sub-zero temperatures. Funny to think that just last week we were walking along the beach, wearing just our trunks! Doing that on the east coast of Scotland right now could have some dire consequences!!

But, as I promised, in my last post I wanted to bake something that I had on holiday – the custard tarts that I enjoyed. I have seen these called Pasteis De Nata or Pastel De Nata, not sure if one is the plural of the other, but it doesn’t affect how they taste – so let’s crack on.

There are various recipes all over the place, and I cobbled together a few basic ones. I have added cinnamon, which doesn’t appear in a lot of them, but I wanted to include the spice, as it would remind me of the eggy custard that my Granny Hetty made for me when I was little. Also, a lot of the recipes have you making your own pastry. I have one mantra in life (when it comes to baking anyway) and that is ‘Life is too short to make your own pastry’. Particularly when you can pick a ready-made pack from Tesco!

Yield: 12 delicious tarts

Ingredients:
1 pack ready rolled puff pastry
240 ml milk
3 tablespoons cornflour
200 grams caster sugar
½ teaspoon vanilla extract
¼ teaspoon ground cinnamon
6 egg yolks

Method:
Pre-heat your oven to 180oC. Now, I sprayed my 12 cup square muffin pan with some non-stick spray, not essential, but grease just to be on the safe side! Line each muffin well with puff pastry and trim off any excess. Set pan aside.


Whisk together the 6 egg yolks in a bowl and set aside. In a saucepan place the milk, cornflour, sugar, vanilla and cinnamon, over medium heat, stir until slightly thickened. Now drizzle half of the warm milk mix – VERY SLOWLY - into the egg yolks, stirring constantly. Tipping it all in would result in scrambled eggs, which you really don’t want. Add the yolk mix into the saucepan with the remaining milk mix and heat until boiling and thickened, stirring constantly. 


Remove from the heat and divide the custard mix into the 12 pastry lined wells. 


Pop this into the oven for 20 minutes. The custard mix will rise high during baking and start to darken. Once removed from the oven, it will shrink back and sink slightly which is normal, don’t worry!

Leave the tarts to cool completely and then remove carefully from the pan (I used a small fork to assist me).

These custard tarts are actually better than I had in Portugal I have to say and that is probably down to my love of cinnamon. If you don’t like cinnamon or want to be totally authentic then omit it, no harm done. The pastry is lovely with the thick, spiced vanilla filling – and even nicer with a hot cup of coffee! Enjoy :)

I am entering these delicacies into September's Alphabakes challenge, hosted by this month by Caroline Makes and ably assisted by The More Than Occasional Baker. This month the letter is 'P' and luckily both Portuguese Custard Tarts and Pasteis De Nata hit the mark!